

Samsung Galaxy Camera, a 16-megapixel point-and-shoot camera with a motorized 21x zoom, a 4.8-inch touchscreen, and 3G / Wi-Fi connectivity. It's not the first camera to claim to be "smart" — Samsung itself sells cameras under that banner — but it is one of the first to run an established OS, Android 4.1.
Thanks to one of xda-forum member who already make such a usefull toolkit for the Samsung Galaxy Camera, which include the features of Drivers, Backup, Unlock, Root, Recovery, Flash, Mods + MORE.


NOTE: As the ToolKit.exe and ModsSection.exe files are not Digitally Signed with a Microsoft Certificate they 'may' get picked up as potentially harmful by Antivirus Programs and deleted on first run. If this happens restore the file and exclude it from future scans to use it. This seems to happen mostly on AVG Free and Norton which is why I switched to BitDefender which is much better.
IMPORTANT: ONLY FLASH ROMS THAT ARE SPECIFICALLY MADE FOR YOUR PHONES MODEL NUMBER AS FLASHING AN INCORRECT ROM CAN SOFT BRICK YOUR DEVICE!
FUNCTIONS OF SAMSUNG GALAXY CAMERA TOOLKIT V1.0
- Install drivers automatically
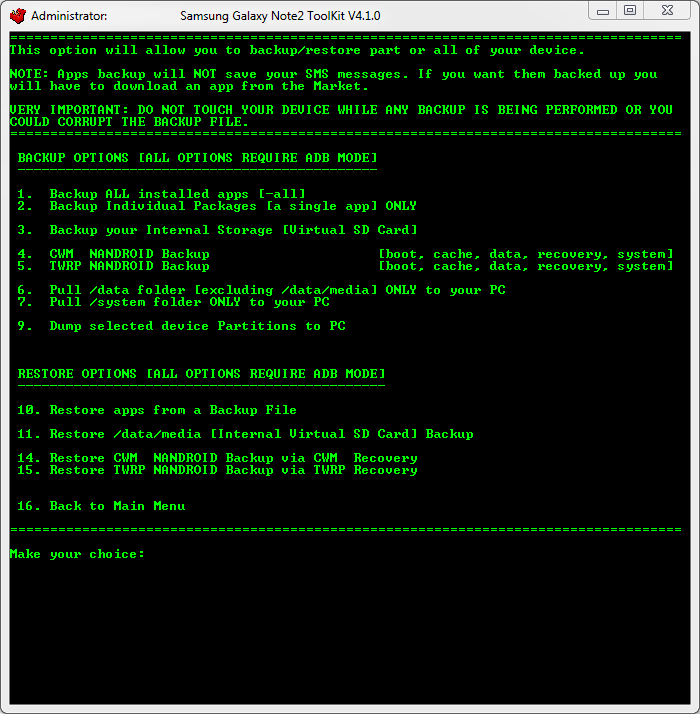
- Backup/Restore a single package or all apps, user data and Internal Storage
- Backup your /data/media (virtual SD Card) to your PC for a Full Safe backup of data
- Root any public build (different options)
- Flash Stock Recovery image to device
- Perform a FULL NANDROID Backup of your system via adb and save in Custom Recovery format on your PC
- Pull /data and /system folders, compress to a .tar file and save to your PC
- Auto Update ToolKit on startup (donators feature)
- Dump selected Partitions, compress to a .zip file with md5 and save to your PC
- Install BusyBox binary on device
- Rename Recovery Restore files if present
- Download, Extract and Flash Stock Rom (full steps)
- Flash Insecure Boot Image for adb mode
- Flash Stock Boot Image back to your device
- Create tar file to flash via Odin with 1-click process
- Rip cache.img to zip file in CWM format
- Install a single apk or multiple apk's to your device
- Push Files from your PC to your device
- Pull Files from your device to your PC
- Set Files Permissions on your device
- Dump selected LogCat buffers to your PC
- Dump BugReport to your PC (if installed)
- Help, Information Screen for various tasks
- Mods Section to modify your device (increase bitrate for video, increase camera quality settings, fix permissions in Internal Storage)
- Reboot Device options in adb mode
- Change background, text colour in ToolKit
Credits: ChainsDD for Superuser, Chainfire for SuperSU


.jpg)


