Showing posts with label Sony Tutorial. Show all posts

Tutorial to Unlocking Bootloader of Sony Xperia Z


So, here we are again. Today i would explain about how to unlocking the bootloader of other device. Last time we have pisted many tutorial about it. But, in this tutorial we will be discussing the step by step procedure on how to unlock the bootloader of the Sony Xperia Z. A bootloader is a code present in any computing device that is loaded first before any operating system. This code is specific to the hardware of a certain device which means different devices will have different bootloaders. In the Android environment a bootloader lets your smartphone or tablet boot into Android.

Device manufacturers normally ship their products with locked bootloaders so that consumers will stick to the Android version that’s running on the device. While this may be great for those who are new to the Android environment since there’s a slim chance of the device getting bricked, advanced users see this as a hindrance in their customization efforts. To be able to run custom ROMs or apps that require root permission the bootloader of a device must be unlocked first.

The good thing about Sony is that they are supporting the open developer community thus making it easier for anyone to unlock the bootloader of certain Xperia devices. The company’s latest flagship model, Sony Xperia Z (C6602), is one of the devices supported for unlocking. There might however be some releases that will not support unlocking due to operator restrictions.

Things to consider before unlocking your device bootloader

When you unlock the bootloader you may void the warranty of your device. You must check on the specifics of the warranty of your device for details on this. You may lose certain content on your device due to the removal of the DRM security key. The SD card of your device will be formatted thus losing any data such as photos, videos, music or documents stored.

Confirm first if it is possible to unlock the bootloader of your particular device. This can be done by opening the phone dialer and entering *#*#7378423#*#*. Go to Service info > Configuration > Rooting Status. If it says yes then you can proceed with unlocking the bootloader.

Unlocking the bootloader of Sony Xperia Z

Requirements:
  • You need to download the fastboot package with USB drivers
  • It is recommended that you use a Windows 7 PC with a USB cable to connect your Xperia Z. 
  • Turn off your device and press on the Volume Up button while connecting it via USB to your PC. This enables fastboot mode and will let Windows start the driver installation. 
  • Extract the fastboot package file and point the driver install to the usb_driver folder. 
  • Once done disconnect your smartphone turn it on.

Steps to unlocking bootloader of Sony Xperia Z
  • Go to: http://unlockbootloader.sonymobile.com/ and read everything
  • At the bottom of the page click ‘Start Unlocking the Bootloader’
  • You will get numerous prompts, read all info and click on “Accept”/”OK”/”Proceed”
  • You will then get to the “Create Unlock request” page, enter your IMEI (sometimes the last digit needs to be removed for this to work), name and email address
  • Check your email for the unique unlock key
  • Extract fastboot_with_Android_USB_file.rar and open fastboot folder
  • Hold SHIFT and right click on the background of the folder
  • Select ‘Open command window here’
  • Connect your Xperia Z in fastboot mode (turn phone off, hold Volume UP button and plug in USB Cable) In the cmd windows type in fastboot.exe -i 0x0fce getvar version
  • A 0.5 value is returned  means the device is correctly connected
  • Type in fastboot.exe -i 0x0fce oem unlock 0xKEY and replace KEY with the key which you received earlier.
  • Your device should now be bootloader unlocked

How to Root Sony Xperia Z Both for Locked and Unlocked Bootloader


On this article i will explain the way to root the beast of Sony mobile phone, Xperia Z. We must already know that Xperia Z is one of the best smartphone right now. It can compete with the other on many aspect. But, to gain more access of the phone we should root the device first.

Caution: In my experience nothing has ever gone wrong with rooting. There is always that slight chance something can mess up. Use caution and only do this if you want to. I am not responsible if anything happens (but I really don’t think anything will happen if you do everything right)  Also rooting voids your warranty but don’t worry, unrooting should give it back like nothing ever happened.!! Please read about Rooting here.

Note:
  • The instructions in this guide are intended for use with Xperia Z. Applying these instructions on another device or model may produce undesired outcomes.
  • The information in this guide is provided for instructional and educational purposes only. There is no guarantee that these instructions will work under your specific and unique circumstances.
  • Use these instructions at your own risk. We shall not hold any responsibility or liability for whatever happens to you or your device arising from your use of the info in this guide.
  • Read and understand the whole guide first before actually performing the instructions.
  • This Procedure works for Mobiles having stock ROM only, and will definitely void your warranty, although the warranty can be claimed by un-rooting your device.

What you need to prepare:
  • Xperia Z and a PC
  • Backup all personal data on your phone to make sure you have a copy of your personal data (e.g., contacts, SMS, MMS, Internet settings, Wi-Fi passwords, and the like) in case the procedure in this guide erases such data. You may skip this step.
  • Make sure your device has at least 75% of phone battery charge.
  • Download Root_with_restore_by_Bin4ry_v26

Root Xperia Z (Both locked and unlock bootloader)

1. Go to settings > developers
2. Check USB debugging
3. Connect xperia Z to pc / laptop
4. Wait until windows detect your device
5. Go to root_with_restore extract folder
6. Run runme.bat
7. Select option number 3


8. Select restore my data


9. choose service test


10. Then select Display


11. Follow the instructions
12. Done, your xperia Z is root

How to Root Sony Xperia Acro S Using Bin4ry’s Root Tool


Acro S is one the best device made by Japanese manufacture. It comes with great features and amazing design. One of the famous features inside of Acro S is the water and dust resistance. So, it is normal when many people dream of having this device. On this article i will explain a tutorial about how to root Sony Xperia Acro S using a famous tool made by a member of xda-forum which is called Bin4ry Tool. 

Thanks to xda forum members [Bin4ry] who always try their best to make the Android OS looks better in its performance and customization. So, here we go please read this tutorial carefully. The choice between rooting or not lies on your hand.


Caution: In my experience nothing has ever gone wrong with rooting. There is always that slight chance something can mess up. Use caution and only do this if you want to. I am not responsible if anything happens (but I really don’t think anything will happen if you do everything right)  Also rooting voids your warranty but don’t worry, unrooting should give it back like nothing ever happened.!! Please read about Rooting here.

Note:
  • The instructions in this guide are intended for use with the Sony Xperia Acro S.  Applying these instructions on another device or model may produce undesired outcomes.
  • The information in this guide is provided for instructional and educational purposes only. There is no guarantee that these instructions will work under your specific and unique circumstances.
  • Use these instructions at your own risk. We shall not hold any responsibility or liability for whatever happens to you or your device arising from your use of the info in this guide.
  • Read and understand the whole guide first before actually performing the instructions.
  • This Procedure will definitely void your warranty, although the warranty can be claimed by un-rooting your device.


What you need to prepare:
  • A Sony Xperia Acro S and a PC
  • Backup all personal data on your phone to make sure you have a copy of your personal data (e.g., contacts, SMS, MMS, Internet settings, Wi-Fi passwords, and the like) in case the procedure in this guide erases such data. Guide from here
  • Make sure your device has at least 75% of phone battery charge.


How to root using Bin4ry’s Root Tool
  • Download the tool from here. (mirror mediafire)
  • Extract the downloaded zip file to a convenient location on the computer.
  • Ensure that you are running an android OS of ICS or JB on your device. This will not work on Android 2.3 or older versions of Android.
  • Make sure drivers for your Android device are installed on the computer. Drivers for most devices can be installed by installing the manufacturer’s PC suite software.
  • On your phone/tablet, enable USB debugging in the Settings » Developer options menu.
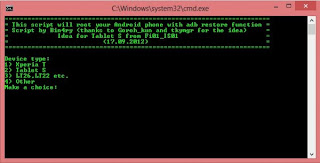
  • Run the tool by double-clicking the RunMe.bat file from the folder where you extracted the tool in step 2.
  • Then, make the correct choice according to whatever device you have.
  • Connect your device to the computer. Then, follow on-screen instructions to root your device.

Note:
Xperia phones with "older" firmware = Normal mode
Sony Tablet and similar = Special mode
Xperia phones with JB Firmare = Mode 3

Notice:
  • Normal Mode will not wipe any other data, dont worry!
  • Special Mode CAN wipe your data, Rollback SHOULD restore, but to be sure backup you data somehow!
  • New Mode SHOULD be able to root all new Sony Firmwares like 2.55 and higher where Normal mode was failing

Congratulation ! now your Sony Xperia Acro S has been rooted. Enjoy the advantages of the rooted device. Please give us a feedback on the comment section below.

How to Root Sony Xperia P Using Bin4ry’s Root Tool


On this article i will explain a tutorial about how to root Sony Xperia P using a famous tool made by a member of xda-forum which is called Bin4ry Tool. 

Thanks to xda forum members [Bin4ry] who always try their best to make the Android OS looks better in its performance and customization. So, here we go please read this tutorial carefully. The choice between rooting or not lies on your hand.


Caution: In my experience nothing has ever gone wrong with rooting. There is always that slight chance something can mess up. Use caution and only do this if you want to. I am not responsible if anything happens (but I really don’t think anything will happen if you do everything right)  Also rooting voids your warranty but don’t worry, unrooting should give it back like nothing ever happened.!! Please read about Rooting here.

Note:
  • The instructions in this guide are intended for use with the Sony Xperia P  Applying these instructions on another device or model may produce undesired outcomes.
  • The information in this guide is provided for instructional and educational purposes only. There is no guarantee that these instructions will work under your specific and unique circumstances.
  • Use these instructions at your own risk. We shall not hold any responsibility or liability for whatever happens to you or your device arising from your use of the info in this guide.
  • Read and understand the whole guide first before actually performing the instructions.
  • This Procedure will definitely void your warranty, although the warranty can be claimed by un-rooting your device.


What you need to prepare:
  • A Sony Xperia P and a PC
  • Backup all personal data on your phone to make sure you have a copy of your personal data (e.g., contacts, SMS, MMS, Internet settings, Wi-Fi passwords, and the like) in case the procedure in this guide erases such data. Guide from here
  • Make sure your device has at least 75% of phone battery charge.


How to root using Bin4ry’s Root Tool
  • Download the tool from here. (mirror mediafire)
  • Extract the downloaded zip file to a convenient location on the computer.
  • Ensure that you are running an android OS of ICS or JB on your device. This will not work on Android 2.3 or older versions of Android.
  • Make sure drivers for your Android device are installed on the computer. Drivers for most devices can be installed by installing the manufacturer’s PC suite software.
  • On your phone/tablet, enable USB debugging in the Settings » Developer options menu.
  • Run the tool by double-clicking the RunMe.bat file from the folder where you extracted the tool in step 2.
  • Then, make the correct choice according to whatever device you have.
  • Connect your device to the computer. Then, follow on-screen instructions to root your device.

Note:
Xperia phones with "older" firmware = Normal mode
Sony Tablet and similar = Special mode
Xperia phones with JB Firmare = Mode 3


Notice:
  • Normal Mode will not wipe any other data, dont worry!
  • Special Mode CAN wipe your data, Rollback SHOULD restore, but to be sure backup you data somehow!
  • New Mode SHOULD be able to root all new Sony Firmwares like 2.55 and higher where Normal mode was failing

Congratulation ! now your Sony Xperia P has been rooted. Enjoy the advantages of the rooted device. Please give us a feedback on the comment section below.

How to Root Sony Xperia U Using Bin4ry’s Root Tool


On this article i will explain a tutorial about how to root Sony Xperia U using a famous tool made by a member of xda-forum which is called Bin4ry Tool. 

Thanks to xda forum members [Bin4ry] who always try their best to make the Android OS looks better in its performance and customization. So, here we go please read this tutorial carefully. The choice between rooting or not lies on your hand.


Caution: In my experience nothing has ever gone wrong with rooting. There is always that slight chance something can mess up. Use caution and only do this if you want to. I am not responsible if anything happens (but I really don’t think anything will happen if you do everything right)  Also rooting voids your warranty but don’t worry, unrooting should give it back like nothing ever happened.!! Please read about Rooting here.

Note:
  • The instructions in this guide are intended for use with the Sony Xperia U. Applying these instructions on another device or model may produce undesired outcomes.
  • The information in this guide is provided for instructional and educational purposes only. There is no guarantee that these instructions will work under your specific and unique circumstances.
  • Use these instructions at your own risk. We shall not hold any responsibility or liability for whatever happens to you or your device arising from your use of the info in this guide.
  • Read and understand the whole guide first before actually performing the instructions.
  • This Procedure will definitely void your warranty, although the warranty can be claimed by un-rooting your device.


What you need to prepare:
  • A Sony Xperia U and a PC
  • Backup all personal data on your phone to make sure you have a copy of your personal data (e.g., contacts, SMS, MMS, Internet settings, Wi-Fi passwords, and the like) in case the procedure in this guide erases such data. Guide from here
  • Make sure your device has at least 75% of phone battery charge.


How to root using Bin4ry’s Root Tool
  • Download the tool from here. (mirror mediafire)
  • Extract the downloaded zip file to a convenient location on the computer.
  • Ensure that you are running an android OS of ICS or JB on your device. This will not work on Android 2.3 or older versions of Android.
  • Make sure drivers for your Android device are installed on the computer. Drivers for most devices can be installed by installing the manufacturer’s PC suite software.
  • On your phone/tablet, enable USB debugging in the Settings » Developer options menu.
  • Run the tool by double-clicking the RunMe.bat file from the folder where you extracted the tool in step 2.
  • Then, make the correct choice according to whatever device you have.
  • Connect your device to the computer. Then, follow on-screen instructions to root your device.

Note:
Xperia phones with "older" firmware = Normal mode
Sony Tablet and similar = Special mode
Xperia phones with JB Firmare = Mode 3


Notice:
  • Normal Mode will not wipe any other data, dont worry!
  • Special Mode CAN wipe your data, Rollback SHOULD restore, but to be sure backup you data somehow!
  • New Mode SHOULD be able to root all new Sony Firmwares like 2.55 and higher where Normal mode was failing

Congratulation ! now your Sony Xperia U has been rooted. Enjoy the advantages of the rooted device. Please give us a feedback on the comment section below.

How to Root Sony Xperia T running on Android 4.0 Ice Cream Sandwich [Tutorial]


Another Xperia series showing up to ready to be rooted. This time we will explain a tutorial about how to root Sony Xperia T which released with an official Android 4.0 Ice Cream Sandwich. Previously we have explained and posted the same tutorial for Xperia which is Sony Xperia S, now for those the owners of Sony Xperia T do not worry not to get the rooting guide.

Thanks to xda forum members who always try their best to make the Android OS looks better in its performance and customization. So, here we go please read this tutorial carefully. The choice between rooting or not lies on your hand.


Caution: In my experience nothing has ever gone wrong with rooting. There is always that slight chance something can mess up. Use caution and only do this if you want to. I am not responsible if anything happens (but I really don’t think anything will happen if you do everything right)  Also rooting voids your warranty but don’t worry, unrooting should give it back like nothing ever happened.!! Please read about Rooting here.

Note:
  • The instructions in this guide are intended for use with the Sony Xperia T running on Android 4.0 Ice Cream Sandwich. Applying these instructions on another device or model may produce undesired outcomes.
  • The information in this guide is provided for instructional and educational purposes only. There is no guarantee that these instructions will work under your specific and unique circumstances.
  • Use these instructions at your own risk. We shall not hold any responsibility or liability for whatever happens to you or your device arising from your use of the info in this guide.
  • Read and understand the whole guide first before actually performing the instructions.
  • This Procedure will definitely void your warranty, although the warranty can be claimed by un-rooting your device.


What you need to prepare:
  • A Sony Xperia T running on Android 4.0 Ice Cream Sandwich and a PC
  • Backup all personal data on your phone to make sure you have a copy of your personal data (e.g., contacts, SMS, MMS, Internet settings, Wi-Fi passwords, and the like) in case the procedure in this guide erases such data. Guide from here
  • Make sure your device has at least 75% of phone battery charge.


How to root using Bin4ry’s Root Tool
  • Download the tool from here.
  • Extract the downloaded zip file to a convenient location on the computer.
  • Ensure that you are running an Android 4.0 or Android 4.1 ROM on your device. This will not work on Android 2.3 or older versions of Android.
  • Make sure drivers for your Android device are installed on the computer. Drivers for most devices can be installed by installing the manufacturer’s PC suite software.
  • On your phone/tablet, enable USB debugging in the Settings » Developer options menu.
  • Run the tool by double-clicking the RunMe.bat file from the folder where you extracted the tool in step 2.
  • Then, make the correct choice according to whatever device you have (enter 4 for the normal method which is to be used for all non-Sony devices), then press Enter.
  • Connect your device to the computer. Then, follow on-screen instructions to root your device.

Congratulation ! now your Sony Xperia T has been rooted. Enjoy the advantages of the rooted device. Please give us a feedback on the comment section below.

How to Root Sony Xperia S running on Android 4.0 Ice Cream Sandwich [Tutorial]


Sony Xperia S is one of the best smartphones on the market so far. It is released with the official Android 2.3 Gingerbread, but lately it is planed to updagre to Android 4.0 Ice Cream Sandwich. For those who have Sony Xperia S running on Android 4.0 Ice Cream Sandwich and want to root their device, on this article i will show you how to root the Sony Xperia S using one amazing tool called Bin4ry's root tool.

Thanks to xda forum members who always try their best to make the Android OS looks better in its performance and customization. So, here we go please read this tutorial carefully. The choice between rooting or not lies on your hand.


Caution: In my experience nothing has ever gone wrong with rooting. There is always that slight chance something can mess up. Use caution and only do this if you want to. I am not responsible if anything happens (but I really don’t think anything will happen if you do everything right)  Also rooting voids your warranty but don’t worry, unrooting should give it back like nothing ever happened.!! Please read about Rooting here.

Note:
  • The instructions in this guide are intended for use with the Sony Xperia S running on Android 4.0 Ice Cream Sandwich. Applying these instructions on another device or model may produce undesired outcomes.
  • The information in this guide is provided for instructional and educational purposes only. There is no guarantee that these instructions will work under your specific and unique circumstances.
  • Use these instructions at your own risk. We shall not hold any responsibility or liability for whatever happens to you or your device arising from your use of the info in this guide.
  • Read and understand the whole guide first before actually performing the instructions.
  • This Procedure will definitely void your warranty, although the warranty can be claimed by un-rooting your device.


What you need to prepare:
  • A Sony Xperia S running on Android 4.0 Ice Cream Sandwich and a PC
  • Backup all personal data on your phone to make sure you have a copy of your personal data (e.g., contacts, SMS, MMS, Internet settings, Wi-Fi passwords, and the like) in case the procedure in this guide erases such data. Guide from here
  • Make sure your device has at least 75% of phone battery charge.


How to root using Bin4ry’s Root Tool
  • Download the tool from here.
  • Extract the downloaded zip file to a convenient location on the computer.
  • Ensure that you are running an Android 4.0 or Android 4.1 ROM on your device. This will not work on Android 2.3 or older versions of Android.
  • Make sure drivers for your Android device are installed on the computer. Drivers for most devices can be installed by installing the manufacturer’s PC suite software.
  • On your phone/tablet, enable USB debugging in the Settings » Developer options menu.
  • Run the tool by double-clicking the RunMe.bat file from the folder where you extracted the tool in step 2.
  • Then, make the correct choice according to whatever device you have (enter 4 for the normal method which is to be used for all non-Sony devices), then press Enter.
  • Connect your device to the computer. Then, follow on-screen instructions to root your device.

Congratulation ! now your Sony Xperia S has been rooted. Enjoy the advantages of the rooted device. Please give us a feedback on the comment section below.

How to Unlocking Bootloader on Sony Ericsson X10 Mini Using SE Tweaker Tool (Tutorial)


Previously we have been posted the tutorial about how to unlocking bootloader on Sony Ericsson X8 here, and Sony Ericsson W8 here, now i will explain the tutorial about unlocking bootloader on Sony Ericsson X10 Mini. This tutorial also uses same methods as before in which using SE Tweaker Tool.

SE Tweaker Tool is a Tool + Guide to make some tweaks to ur phone With ease which includes of all the necessary utilities for many devices. Unlocking the bootloader of your phone will restore the original sim lock of your phone (if you had any) unless if you unlocked with EMMA/IMEI unlock code or it was factory-unlocked or if SE unlocked it! However, some users have reported that using msm7227_semc.cmd on their sim-unlocked phones did not restore the sim lock onto their phone.

Read this before doing Unlocking Bootloader

NOTE: Dealing with the bootloader is highly dangerous and can result in a hard brick if you don't follow the proper instructions. Then, you will have to go and repair your phone by sending it to SE. I am not responsible if your phone dies on you because you didn't follow instructions or you screwed up somehow. Unlock the bootloader on your sim unlocked phone AT YOUR OWN RISK!

Only For people getting error related iscoolbutton.ocx.. Just Run the ocx_fix.bat in the downloaded tool and then Run the SE Tweaker Tool..

Requirements: 
  • Rooted phone, Sony Ericsson PC Companion installed in PC, Courage
  • You do not need to have a sim lock on your phone to unlock your Bootloader.

Recommended:
  • Disable your Antivirus (it might find a "virus" in ADB.exe even though there isn't one and might even interfere in bootloader unlocking process) 
  • USB debugging enabled.

Download the files needed for the unlock.
  • Download Flashtool (needed for S1tool to work properly and for loading custom kernels next time) and install it (not necessary if you already have Flashtool):
  • Download and install Flashtool v0.5.3 here (follow instructions on the website).
  • After installing it, open the flashtool folder and open the drivers folder inside that. Double click on the ggsetup-2.2.0.11.exe file inside and install Gordon's Gate.
  • Then restart your computer. if you dont Find GORDAN'S gate.exe in the drivers folder download it from my attachments.

Steps To unlock Bootloader:
  • After installing Gordans Gate and the flashtool Turn off your phone.
  • Download SE Tweaker Tool also Mirror[Mediafire] and unzip it.
  • Run SE_Tweaker_Tool.exe from it.
  • NOTE: If no flashtool download from the dialog box appeared after running unlockbootloader.exe
  • Turn off ur phone
  • Select unlock_bootloader button.. run S1tool button to check if the your phone has SIM UNLOCK CERTIFICATE.[i.e click on "Do" in s1tool and compare the output]
  • Boot your phone into flash mode (make sure you installed Gordon's Gate and usb debugging is on). All users, press and hold back button while connecting cable from PC to phone. Continue holding back button until you get some output. The LED on your phone should flash green if it is in flash mode.
  • Click on how it should look.. it will give u an idea how the output will be..
  • NOTE- At this moment you should know if you have SIM UNLOCK CERTIFICATE or what ever the output was.. keep that in mind.. 
  • Now disconnect[/COLOR] your phone n boot it up.Connect it again to PC (make sure your USB DEBUGGING is enabled and antivirus is disabled) 
  • Now click the check box which is right for you [Read them carefully it will be according to the output you got with s1tool] run the corressponding button.. 
  • After it proceed to check if the unlocking of bootloader was done by clicking Check If your "Bootloader is unlocked And Proceed" button..
  • Reboot your phone to flashmode as before.. Run s1tool.. N compare the output.. 

If the line RUNNING S1_EROM FROM VER "#8A02$" has a lowercase "r" letter replacing the "#" (RUNNING S1_EROM FROM VER "r8A02$"), your bootloader has been unlocked . If it has an uppercase "R" replacing the "#" (RUNNING S1_EROM FROM VER "R8A02$"), your bootloader is NOT unlocked.


Re-locking the Bootloader Follow the steps in the Tool

DOWNLOAD THE KERNEL WHICH YOU WANT
[Note: If it is downloaded in *.zip or *.rar format just open with any zip tool like Winrar or 7zip tool n extract the *.ftf file to your drive n later put in into the /firmwares folder of flashtool and follow below steps to Flash]

How to flash custom kernels:
  • Put the *.ftf file in the /firmwares folder. ( flash only the .ftf file.)
  • Open Flashtool.
  • Click Flash.
  • Select (kernel name).ftf.
  • Turn off your phone.
  • Connect your phone in flash mode (only when the popup window prompts for you to do so). (To boot into flash mode, press and hold back button while connecting your phone to the PC using an usb cable).
  • Disconnect your phone (do so only when the popup window to prompts you to disconnect your phone).
  • Reboot and you have a custom kernel! 
  • Confirm by going to Settings --> About Phone --> Kernel version. It should have the name of the kernel you flashed.
To flash back to stock kernel, download the file here and follow steps listed above.

How to Unlocking Bootloader on Sony Xperia W8 Using SE Tweaker Tool (Tutorial)


How to Unlocking Bootloader on Sony Xperia W8 Using SE Tweaker Tool (Tutorial)

After i posted the way to unlocking the bootloader of the Sony Xperia X8 on this post, this time i will explain about how to Unloackig Bootloader of the Sony Xperia W8. The tutorial is a little bit same of the previous tutorial.

SE Tweaker Tool is a Tool + Guide to make some tweaks to ur phone With ease which includes of all the necessary utilities for many devices. Unlocking the bootloader of your phone will restore the original sim lock of your phone (if you had any) unless if you unlocked with EMMA/IMEI unlock code or it was factory-unlocked or if SE unlocked it! However, some users have reported that using msm7227_semc.cmd on their sim-unlocked phones did not restore the sim lock onto their phone.

Read this before doing Unlocking Bootloader

NOTE: Dealing with the bootloader is highly dangerous and can result in a hard brick if you don't follow the proper instructions. Then, you will have to go and repair your phone by sending it to SE. I am not responsible if your phone dies on you because you didn't follow instructions or you screwed up somehow. Unlock the bootloader on your sim unlocked phone AT YOUR OWN RISK!

Only For people getting error related iscoolbutton.ocx.. Just Run the ocx_fix.bat in the downloaded tool and then Run the SE Tweaker Tool..

Requirements: 
  • Rooted phone, Sony Ericsson PC Companion installed in PC, Courage
  • You do not need to have a sim lock on your phone to unlock your Bootloader.

Recommended:
  • Disable your Antivirus (it might find a "virus" in ADB.exe even though there isn't one and might even interfere in bootloader unlocking process) 
  • USB debugging enabled.

Download the files needed for the unlock.
  • Download Flashtool (needed for S1tool to work properly and for loading custom kernels next time) and install it (not necessary if you already have Flashtool):
  • Download and install Flashtool v0.5.3 here (follow instructions on the website).
  • After installing it, open the flashtool folder and open the drivers folder inside that. Double click on the ggsetup-2.2.0.11.exe file inside and install Gordon's Gate.
  • Then restart your computer. if you dont Find GORDAN'S gate.exe in the drivers folder download it from my attachments.

Steps To unlock Bootloader:
  • After installing Gordans Gate and the flashtool Turn off your phone.
  • Download SE Tweaker Tool also Mirror[Mediafire] and unzip it.
  • Run SE_Tweaker_Tool.exe from it.
  • NOTE: If no flashtool download from the dialog box appeared after running unlockbootloader.exe
  • Turn off ur phone
  • Select unlock_bootloader button.. run S1tool button to check if the your phone has SIM UNLOCK CERTIFICATE.[i.e click on "Do" in s1tool and compare the output]
  • Boot your phone into flash mode (make sure you installed Gordon's Gate and usb debugging is on). All users, press and hold back button while connecting cable from PC to phone. Continue holding back button until you get some output. The LED on your phone should flash green if it is in flash mode.
  • Click on how it should look.. it will give u an idea how the output will be..
  • NOTE- At this moment you should know if you have SIM UNLOCK CERTIFICATE or what ever the output was.. keep that in mind.. 
  • Now disconnect[/COLOR] your phone n boot it up.Connect it again to PC (make sure your USB DEBUGGING is enabled and antivirus is disabled) 
  • Now click the check box which is right for you [Read them carefully it will be according to the output you got with s1tool] run the corressponding button.. 
  • After it proceed to check if the unlocking of bootloader was done by clicking Check If your "Bootloader is unlocked And Proceed" button..
  • Reboot your phone to flashmode as before.. Run s1tool.. N compare the output.. 

If the line RUNNING S1_EROM FROM VER "#8A02$" has a lowercase "r" letter replacing the "#" (RUNNING S1_EROM FROM VER "r8A02$"), your bootloader has been unlocked . If it has an uppercase "R" replacing the "#" (RUNNING S1_EROM FROM VER "R8A02$"), your bootloader is NOT unlocked.


Re-locking the Bootloader Follow the steps in the Tool

DOWNLOAD THE KERNEL WHICH YOU WANT
[Note: If it is downloaded in *.zip or *.rar format just open with any zip tool like Winrar or 7zip tool n extract the *.ftf file to your drive n later put in into the /firmwares folder of flashtool and follow below steps to Flash]

How to flash custom kernels:
  • Put the *.ftf file in the /firmwares folder. ( flash only the .ftf file.)
  • Open Flashtool.
  • Click Flash.
  • Select (kernel name).ftf.
  • Turn off your phone.
  • Connect your phone in flash mode (only when the popup window prompts for you to do so). (To boot into flash mode, press and hold back button while connecting your phone to the PC using an usb cable).
  • Disconnect your phone (do so only when the popup window to prompts you to disconnect your phone).
  • Reboot and you have a custom kernel! 
  • Confirm by going to Settings --> About Phone --> Kernel version. It should have the name of the kernel you flashed.
To flash back to stock kernel, download the file here and follow steps listed above.


How to Unlocking Bootloader on Sony Xperia X8 Using SE Tweaker Tool (Tutorial)


SE Tweaker Tool is a Tool + Guide to make some tweaks to ur phone With ease which includes of all the necessary utilities for many devices. Unlocking the bootloader of your phone will restore the original sim lock of your phone (if you had any) unless if you unlocked with EMMA/IMEI unlock code or it was factory-unlocked or if SE unlocked it! However, some users have reported that using msm7227_semc.cmd on their sim-unlocked phones did not restore the sim lock onto their phone.

Read this before doing Unlocking Bootloader

NOTE: Dealing with the bootloader is highly dangerous and can result in a hard brick if you don't follow the proper instructions. Then, you will have to go and repair your phone by sending it to SE. I am not responsible if your phone dies on you because you didn't follow instructions or you screwed up somehow. Unlock the bootloader on your sim unlocked phone AT YOUR OWN RISK!

Only For people getting error related iscoolbutton.ocx.. Just Run the ocx_fix.bat in the downloaded tool and then Run the SE Tweaker Tool..

Requirements: 
  • Rooted phone, Sony Ericsson PC Companion installed in PC, Courage
  • You do not need to have a sim lock on your phone to unlock your Bootloader.

Recommended:
  • Disable your Antivirus (it might find a "virus" in ADB.exe even though there isn't one and might even interfere in bootloader unlocking process) 
  • USB debugging enabled.

Download the files needed for the unlock.
  • Download Flashtool (needed for S1tool to work properly and for loading custom kernels next time) and install it (not necessary if you already have Flashtool):
  • Download and install Flashtool v0.5.3 here (follow instructions on the website).
  • After installing it, open the flashtool folder and open the drivers folder inside that. Double click on the ggsetup-2.2.0.11.exe file inside and install Gordon's Gate.
  • Then restart your computer. if you dont Find GORDAN'S gate.exe in the drivers folder download it from my attachments.

Steps To unlock Bootloader:
  • After installing Gordans Gate and the flashtool Turn off your phone.
  • Download SE Tweaker Tool also Mirror[Mediafire] and unzip it.
  • Run SE_Tweaker_Tool.exe from it.
  • NOTE: If no flashtool download from the dialog box appeared after running unlockbootloader.exe
  • Turn off ur phone
  • Select unlock_bootloader button.. run S1tool button to check if the your phone has SIM UNLOCK CERTIFICATE.[i.e click on "Do" in s1tool and compare the output]
  • Boot your phone into flash mode (make sure you installed Gordon's Gate and usb debugging is on). All users, press and hold back button while connecting cable from PC to phone. Continue holding back button until you get some output. The LED on your phone should flash green if it is in flash mode.
  • Click on how it should look.. it will give u an idea how the output will be..
  • NOTE- At this moment you should know if you have SIM UNLOCK CERTIFICATE or what ever the output was.. keep that in mind.. 
  • Now disconnect[/COLOR] your phone n boot it up.Connect it again to PC (make sure your USB DEBUGGING is enabled and antivirus is disabled) 
  • Now click the check box which is right for you [Read them carefully it will be according to the output you got with s1tool] run the corressponding button.. 
  • After it proceed to check if the unlocking of bootloader was done by clicking Check If your "Bootloader is unlocked And Proceed" button..
  • Reboot your phone to flashmode as before.. Run s1tool.. N compare the output.. 

If the line RUNNING S1_EROM FROM VER "#8A02$" has a lowercase "r" letter replacing the "#" (RUNNING S1_EROM FROM VER "r8A02$"), your bootloader has been unlocked . If it has an uppercase "R" replacing the "#" (RUNNING S1_EROM FROM VER "R8A02$"), your bootloader is NOT unlocked.


Re-locking the Bootloader Follow the steps in the Tool

DOWNLOAD THE KERNEL WHICH YOU WANT
[Note: If it is downloaded in *.zip or *.rar format just open with any zip tool like Winrar or 7zip tool n extract the *.ftf file to your drive n later put in into the /firmwares folder of flashtool and follow below steps to Flash]

How to flash custom kernels:
  • Put the *.ftf file in the /firmwares folder. ( flash only the .ftf file.)
  • Open Flashtool.
  • Click Flash.
  • Select (kernel name).ftf.
  • Turn off your phone.
  • Connect your phone in flash mode (only when the popup window prompts for you to do so). (To boot into flash mode, press and hold back button while connecting your phone to the PC using an usb cable).
  • Disconnect your phone (do so only when the popup window to prompts you to disconnect your phone).
  • Reboot and you have a custom kernel! 
  • Confirm by going to Settings --> About Phone --> Kernel version. It should have the name of the kernel you flashed.
To flash back to stock kernel, download the file here and follow steps listed above.


How to Update Sony Xperia Mini X10 to Android 4.1 (Jelly Bean) Using Alpha 2


Apparently the developers can't wait for the official of Sony Mobile to announce the release of official update for the Sony Xperia Mini X10. Ufortunately there is no oficial update for the device on the Jelly Bean. Therefore, here is the unofficial tutorial to update your Xperia Mini X10 to Android 4.1 (Jelly Bean) Using Alpha 2.

What we may need to know is the latest Android OS 4.1 Jelly Bean is working great on the device even though there are still many features can't working perfectly, but the Alpha is still under development. So, for those who curious to taste the feel of Jelly Bean on their Mini X10, just follow the tutorial below.

This is not an official ROM and hence you need to wipe data to get this working on your device. Wiping data helps you prevent low memory issues and force closes. Before you wipe data on your device, make sure you backup all important data using the steps given in the Prerequisites section.

Before you proceed with the installation, make sure you have rooted your phone, installed ClockworkMod Recovery and unlocked the bootloader.

Working features:

Display
Touchscreen
Bluetooth
HW Acceleration
Usb (Storage and Adb)
Charging
Sensors
Vibration
GPS
Lockscreen
SuperUser
Gallery
Take Screenshot
Hardware Keys
New Adreno200 Libs
Terminal
GSM
Data
Lights
WiFi

Not Working features:


Music playing
Ringer
Notification
In call mic
FM Radio
Camera
Mic
Project Butter
HW video encoder/decoder
Audio/Video Playback
More

Warning
  • The instructions in this guide are intended for use with the Sony Xperia Mini X10. Applying these instructions on another device or model may produce undesired outcomes.
  • The information in this guide is provided for instructional and educational purposes only. There is no guarantee that these instructions will work under your specific and unique circumstances.
  • Use these instructions at your own risk. We shall not hold any responsibility or liability for whatever happens to you or your device arising from your use of the info in this guide.
  • Read and understand the whole guide first before actually performing the instructions.

What you need to prepare:
  • Before installation of Jelly Bean on your Sony Xperia Mini X10, it is better to back up your phone to keep your files and data setiing on your phone save. Make sure you have rooted your Sony Xperia Mini X10 and xRecovery is installed on your phone. The back up process we use now is using the tutorial below using xRecovery from the files above. For the tutorial to back up your Sony Xperia Mini X10, follow the link here
  • Make sure that your battery has a charge of at least 80% to prevent your device from shutting down in the middle of the update process. After you backup your phone, now follow the steps below carefully to avoid any unwanted thing to your phone:

Steps to upgrade the Android 4.1 Jelly Bean on Sony Xperia Mini X10
  • Download the ROM zip file and Kernel ftf file from here and here 
  • Connect your phone to the SD card and copy the ROM zip file from the Computer to your SD card, preferably in the root folder and not within any folder deep inside.
  • Having USB Debugging enabled and the necessary drivers installed, place the ftf kernel file in the firmwares directory.
  • Use the flashtool to flash the ftf file to your device.
  • After flashing the kernel, turn off your phone and boot it into recovery mode You can use the commandadb reboot recovery to reboot into recovery mode.
  • In recovery mode, wipe all data, cache and dalvik cache.
  • Go to “install zip from SD card”>”Choose zip from SD card” and select the ROM zip file.
  • Go back and select “Reboot system now”.
  • To get Market and other Google apps working, you can flash Gooogle Apps zip file which can be obtained from goo.im/gapps
Congratulation, now your Sony Xperia Mini X10 has been updated to the latest Android Jelly Bean, feel free to leave the comment below.

How to Root Sony Ericsson Xperia X8 Step by Step (Tutorial)

Since many homemade applications have been made to give more experience for Smartphone users, there is a requirement in order to access the apps for rooting the device first. When your device is already rooted then you have the access to install many application of to any setting on your devices or adding some features, such as changing font or updating the unofficial custom Rom.


When you have a control on your phone, then it might be interesting because your phone is different than any other original phone that didn't root yet. This article will explain how to root Sony Ericsson X8 so you can update your Xperia X8 or you can add any application that requires a rooting.

However, we recommend you to consider carefully wether or not your phone requires the rooting process. When you root your device, usually the warranty will void. Please follow the steps carefully because we are not responsible of any damage occur on your device.

Steps to root the Sony Ericsson Xperia X8:
  • First you need to download and install the Xperia X8 USB Drivers on your PC
  • Turn on USB debugging on your device: Go to -> Settings -> Applications -> Development ->U SB Debugging
  • Download the latest SuperOneClick.zip file to your Windows computer. (in case you need to register)
  • Extract the files from the .zip file into a new folder on your Windows PC.
  • Restart both. The PC and X8 just in case.
  • Plug your phone in to your PC and turn on USB debugging. Note: DO NOT MOUNT THE SD CARD!!!
  • Open the folder with the SuperOneClick contents and double click “SuperOneClick.exe”.
  • Run the program, click root and wait few minutes. Done.
Note: If it doesn’t work at the first time just re-run the program once or twice.

Congratulations! your device is now rooted and you can use your device to install any homemade applications or changing your phone and setting. You also able to update your operating system to the next higher Android OS. Enjoy!

Tutorial credit: xperia-x8.com

How to Update Sony Ericsson Xperia X8 into Android 2.3 (Gingerbread)

This article will explain about how to update Sony Ericsson Xperia X8 to OS Android v2.3 Gingerbread. Xperia X8 was released featured with the official system of Android 2.1 Ecrair, and no update is provided for this type of Sony Ericsson phone. So, people who want to update their X8 should know that the update will destroy the guarantee of the phone itself. You have to consider first wether you want to get along this update or just stay on the Android version on the phone.


After you have decided on the condition of the phone, and you still want to update your phone, this article is the right option. I will try to explain the steps of the updating X8 into Android OS v2.3 Gingerbread. Before going on the updating process, you need to prepare some files for the requirement of the update. Here are the file you should download first

Files you need to download: (Click to get redirected to the download page).

1. Download Android 2.3 Gingerbread ROM
2. Download xRecovery

Before installation of Gingerbread on you X8, it is better to back up your phone to keep your files and data setiing on your phone save. Make sure you have rooted your X8 and xRecovery is installed on your phone. The back up process we use now is using the tutorial below using xRecovery from the files above. For the tutorial to back up your X8, follow the link below:
How to Backup Your OS Android Phones Using xRecovery
After you backup your phone, now follow the steps below carefully to avoid any unwanted thing to your phone:
  • Create a new folder on your desktop and rename it as per your choice. Here let’s consider that folder’s name is “XYZ”
  • Now move the downloaded “Android Froyo Custom ROM” to the “XYZ” folder.
  • The Custom ROM is a RAR archive so you need to extract it using WinRAR.
  • For extracting the Custom Rom just Right Click on the file and then click on “Extract Here”
  • It will get extracted and “Android Gingerbread Custom ROM’s” folder will be created.
  • Now connect your Sony Ericsson XPERIA X8 Phone with your PC via USB cable.
  • Select “Open Folder to view files” in the Autoplay box and then click on OK.
  • Now Go To backup folder present inside the xrecovery folder (xrecovery – > backup)
  • Copy “Android Gingerbread Custom ROM’s” folder to backup folder from “XYZ” folder.
  • When it’s done, disconnect your phone from your PC.
  • Switch/Power off your phone and wait for five seconds.
  • Now Switch/Power on your phone again and as soon as the Sony Ericsson logo flashes on the screen start pressing the back key continuously.
  • This will take you to the Xrecovery menu. (This happens only when you have installed xrecovery on your phone.)
  • Now Select “Backup and Restore” in the Xrecovery menu
  • In “Backup and Restore” click on Restore.
  • Now you will see two files
- The backup of your phone
- “Android Froyo Custom ROM” file
  • Select the “Android Gingerbread Custom ROM” file .
  • It will Ask “Are You Sure”. Select “Yes – Restore”
  • Now it will start installing “Android Gingerbread" on your XPERIA X8. Be patient, it will take some amount of time.
  • After five or six minutes installation gets completed and a menu comes in front of you. Select “Reboot” From That Menu and Press Enter. Your Phone will reboot and you will see the change
Congratulations! Your Sony Ericsson is now using the Android OS v2.3 Gingebread. Let us know when there is problem occured on your phone. Enjoy !

How to Install Apps to SD Card on Android 2.1 Eclair (Xperia X8, Xperia W8, and more..)

Many people are wandering if the could install application when they run out the internal memory storage of the phone. This problem might be faced by people who have android phones using the operating system of Android 2.1 Eclair. This problem also occured when i bought Sony Ericsson Xperia W8 yesterday, when i wanted to install the app, it said that i should clean some memory on my phone so i will be able to install the app.


This problem do not occured on the android phones using the OS Android 2.2 Froyo or 2.3 Gingerbread, it is only on Eclair and below. So, this article will explain the steps to install the apps to SD Card on Android 2.1 Eclair.

The steps to install apps to SD Card on Android 2.1 Eclair (Xperia X8, Xperia W8, and more..)

1. First of all, you need to download Link2SD or mediafire link. It is free and can be downloaded from Android market. You can help the developer by donating it.

Link2SD is much better than App2SD. Try it! It only needs root. It runs on 2.1!vAs we all know already that we can install Apps to SD card with Froyo or Gingerbread. The thing that makes Link2SD so different from the others is that this one supports Android 1.6 and up. Yes, even with Android Eclair is possible to install games to SD card and get some free memory for using.

After installing Link2SD to your Android phones running Android 2.1 or even Android 1.6 you’ll be able to get much more apps than you can imagine. So, before using this free apps you should root your Android phones first. Don’t worry it’s much more easy to root than flashing the whole Android with new ROM.

2. Secondly, you should have two partitions on SD card and both should be primary. The first FAT partition is your standard SD card storage. The second partition is used for application files and can be ext2, ext3, ext4 or FAT32.

Some phones lack the ext2, ext3 or ext4 file system support and you may get mount errors like “no such device”, “invalid argument”. These phones need ext2.ko or ext3.ko modules and even some additional modules to be able to mount. Using FAT32 on the second partition will eleminate such problems, because FAT32 is supported on all phones.

Link2SD does not create the second partition, you need to create it yourself. You can use any partition manager such as Minitool, Paragon, Easeus etc. for this.

Tutorial Credit: xperia-x8.com

How to Update Sony Ericsson Xperia X8 into Android 2.2 (Froyo)

The way to update Sony Ericsson Xperia X8 is quite easy when you know the steps of update which are not really complicated. It is right, the official Android OS on the Xperia X8 is not provided any update to the next Android 2.2 (Froyo). So, i bet you know that doing some update on your Xperia X8 will destroy the warranty of your phone.


When you decided to update your Xperia X8 into Android 2.2 Froyo, this article will explain about the ways to do it. Just follow the procedures on this article to avoid any damage of your phone. Note: We are not responsible of any damage on your phone using the tutorial on this article. So, you must do at your own risk.

Before doing some update, please make sure that your phone is fully charged or there is at least 80% of battrey power on your phone. After you have enough battrey power on your phone, you should prepare the files for updating process.

Files you need to download: (Click to get redirected to the download page).

1. Download Android 2.2 Froyo Custom ROM
2. Download xRecovery 

Before installation of Froyo on you X8, it is better to back up your phone to keep your files and data setiing on your phone save. Make sure you have rooted your X8 and xRecovery is installed on your phone. The back up process we use now is using the tutorial below using xRecovery from the files above. For the tutorial to back up your X8, follow the link below:

How to Backup Your OS Android Phones Using xRecovery

After you backup your files from your phone, follow these steps below:
  • Create a new folder on your desktop and rename it as per your choice. Here let’s consider that folder’s name is “XYZ”
  • Now move the downloaded “Android Froyo Custom ROM” to the “XYZ” folder.
  • The Custom ROM is a RAR archive so you need to extract it using WinRAR.
  • For extracting the Custom Rom just Right Click on the file and then click on “Extract Here”
  • It will get extracted and “Android Froyo Custom ROM’s” folder will be created.
  • Now connect your Sony Ericsson XPERIA X8 Phone with your PC via USB cable.
  • Select “Open Folder to view files” in the Autoplay box and then click on OK.
  • Now Go To backup folder present inside the xrecovery folder (xrecovery – > backup)
  • Copy “Android Froyo Custom ROM’s” folder to backup folder from “XYZ” folder.
  • When it’s done, disconnect your phone from your PC.
  • Switch/Power off your phone and wait for five seconds.
  • Now Switch/Power on your phone again and as soon as the Sony Ericsson logo flashes on the screen start pressing the back key continuously.
  • This will take you to the Xrecovery menu. (This happens only when you have installed xrecovery on your phone.)
  • Now Select “Backup and Restore” in the Xrecovery menu
  • In “Backup and Restore” click on Restore.
  • Now you will see two files below:
  • - the backup of your phone
  • - “Android Froyo Custom ROM” file
  • Select the “Android Froyo Custom ROM” file .
  • It will Ask “Are You Sure”. Select “Yes – Restore”
  • Now it will start installing “Android Froyo” on your XPERIA X8. Be patient, it will take some amount of time.
  • After five or six minutes installation gets completed and a menu comes in front of you. Select “Reboot” From That Menu and Press Enter. Your Phone will reboot and you will see the change.

Congratulations! Your Sony Ericsson Xperia X8 is now using the Android 2.2 Froyo. Please let us know when this is succesful. enjoy !

Tutorial credit: xperia-x8.com

[Tutorial] How to Update Sony Ericsson Xperia Play to Android 4.0.4 ICS BETA

Happy news for those Sony Ericsson Xperia Play if they want to update their device as there is available an update of Android 4.0.4 Ice Cream Sandwich  BETA. On this article i will explain the steps to update the Xperia Play to taste the latest version of  Android 4.0.4 ICS even tough this version still Beta but we can taste it on our devices.

[Tutorial] How to Update Sony Ericsson Xperia Play to Android 4.0.4 ICS BETA 
We can see the previous version of update has been missing with several features such as Google Apps and Wi-Fi, but on this version the missing features have been completed. So, let follow the steps below carefully to update your Xperia Play with the firmware of Android 4.0.4 ICS BETA .

What you need to know before updating your phone:

1. Make sure your phone is charged at least 60% of the battery to avoid your phones turned off on the way of updating
2. To avoid any losing data on your device you should backup your phone before the process of update. On many cases the files stored on phones will lost after someone update or root their phone, so follow the tutorial below:
How to Backup SMS, Contacts, Applications, and Settings on Android Phone
After have enough preparation of backup or charging the battery, let's continue to the steps of updating the firmware. Follow the steps below. Please read carefully to make your update successful

How to Update Sony Ericsson Xperia Play to Android 4.0.4 ICS BETA

1) Disconnect your phone from PC or computer and enable USB debugging on your Sony Ericsson Xperia Play, see the steps below:
“Settings> Applications> Development> USB debugging” and check the USB debugging option


2) Make sure your phone is already in the firmware of Android 4.0.2A.0.42. To check your phone see the steps below:
Go into Settings> About phone> Firmware Version.
3) Visit to unlockbootloader.sonymobile.com and unlock the boot loader of your Sony Ericsson Xperia Play.

4) Download the ROM Ice Cream Sandwich beta for Xperia Play.

5) After this, it is necessary to place the downloaded file in the directory quick start and then extract the zip file contents. For example: .. \android-sdk\fastboot\Xperia_PLAY_ICS_beta.

6) Now, with the help of fastboot, you must enter the following commands mentioned below one by one.
fastboot flash boot .. \Fastboot\Xperia_PLAY_ICS_beta\boot.img
fastboot flash userdata .. \Fastboot\Xperia_PLAY_ICS_beta\userdata.img
fastboot flash system .. \Fastboot\Xperia_PLAY_ICS_beta\system.img
7) Once all the commands are processed and have been successful, your device will restart. Now you have to turn off the phone to enter recovery mode. To do this you have to press the power button and while restarting the device, press the volume controls a few times.

9) Once you start the device in recovery mode, use the volume control side to move, and the power button to select. While in recovery mode, select Wipe data/factory reset and then Wipe Cache partition.

10) After Wipe Chache partition then reboot system now.

Now, your Sony Ericsson Xperia Play is featured with the Operating System of Android 4.0.4 ICS Beta, Congratulation !

How to Install Android 4.0 Beta ROM on Xperia Phones

After the update of Android 4.0 Beta ROM is available for Xperia arc S, Xperia neo V and Xperia ray, and according to the information around the world, there are many apps working for this update which surely need to be tasted by the users of Xperia Phones.

But, before install this Beta version of ICS, there are some things that you must know:

1. You should be an advanced developer with extensive knowledge in how to install, and switch between different ROMs.

2. You must be using Xperia™ arc S, Xperia™ neo V or Xperia™ ray, running the latest Xperia™ software release (which is 4.0.2.A.0.42).

3. You must unlock your phone using our Unlock boot loader service, and agree to all the legal and warranty conditions that apply.

4. Also, if you unlock the boot loader, you will not be able to download and install the final Ice Cream Sandwich software upgrade for Xperia™ phones.


Here are the steps to download and install the Android 4.0 Beta ROM on your Xperia Phones (Xperia™ arc S, Xperia™ neo V and Xperia™ ray.):

1. Make sure your phone is running the latest software release, which is build number 4.0.2.A.0.42.  If you can’t upgrade to this build number, it is not possible to try the Ice Cream Sandwich beta ROM for Xperia™ phones.

2. Go to unlockbootloader.sonymobile.com and unlock the boot loader of your phone. To do this, you must read through and agree to all the legal and warranty conditions that apply.

3. Download the Ice Cream Sandwich beta ROM for Xperia™ arc S, the Ice Cream Sandwich beta ROM for Xperia™ neo V or the Ice Cream Sandwich beta ROM for Xperia™ ray depending on your phone model.

4. Extract the downloaded zip file to your Android Fastboot directory. For example: ..\android-sdk\fastboot\Xperia_arcS_ICS_beta.

5. Open a command prompt and go to your Fastboot directory: ..\android-sdk\fastboot\

6. Flash the three beta ROM files one at a time using Fastboot. Use these three commands (replace the folder name if you are using Xperia™ neo V or Xperia™ ray):

•  fastboot flash boot ..\Fastboot\Xperia_arcS_ICS_beta\boot.img
•  fastboot flash userdata ..\Fastboot\Xperia_arcS_ICS_beta\userdata.img
•  fastboot flash system ..\Fastboot\Xperia_arcS_ICS_beta\system.img

7. Once done, please reboot your phone.

Now your phones should be working on the Android 4.0 Beta ROM.

Please Note: We are not responsible for any damage caused from this tutorial. For further information please visit this link.