Showing posts with label Xperia. Show all posts

Sony Xperia ZR, the Mini Version of the Flagship Xperia Z


Dubbed the Sony Xperia ZR, or the Xperia A SO-04E if you happen to live in Japan, the handset itself is rather fetching to look at, just like most of Sony’s smartphones are these days. The beauty is more than skin deep though, and the ZR is apparently waterproof all the way to 5 feet, making it scuba-safe.

Everyone likes it when new smartphones are announced, even when they’re just plain old, by the numbers Android phones. Thankfully, the latest handset to be announced by Sony isn’t plain at old. In fact, it’s actually rather cool. Check it out after the break.

If you’re brave enough to actually take your smartphone into the sea with you, then you’ll be able to film both HD movies and photos in glorious HDR thanks to its 13-megapixel camera and Exmor RS image sensor. The means super awesome 1080p video. Under water. With a smartphone.

The Sony Xperia ZR packs a punch in the specifications department beyond that camera, too. Sony has equipped the ZR with a Snapdragon S4 Pro quad-core 1.5GH CPU, 2GB RAM and all the radios you would expect including NFC and LTE. And it runs Android 4.1 Jelly Bean. Yup, an old OS.

All this sits behind a 4.6-inch 720p display that features an OptiContrast OLED screen with BRAVIA technology which promises to reduce glare even when in direct sunlight. That’s a bold claim, so we’ll take it with a pinch of salt until told otherwise. Still, the promise is there.


In order to show the device off, and the four colors it will be available in – Black, Blue, Pink and Cyan – the Japanese company has released two ads pushing its latest device, one of which features the smartphone being used for a spot of underwater filming in a swimming pool. We’re not sure we’d want to take the thing down to our local swimming pool for fear of being thrown out, but you get the idea!

Sony’s smartphones have taken an upturn of late, and the Xperia ZR appears to continue that trend, especially if you’re a fan of the waterproof smartphone idea and we have to say, it’s one good looking phone. There’s plenty of competition out there these days though, even if this is the only one that you can go swimming with!


How to Root Sony Xperia Acro S Using Bin4ry’s Root Tool


Acro S is one the best device made by Japanese manufacture. It comes with great features and amazing design. One of the famous features inside of Acro S is the water and dust resistance. So, it is normal when many people dream of having this device. On this article i will explain a tutorial about how to root Sony Xperia Acro S using a famous tool made by a member of xda-forum which is called Bin4ry Tool. 

Thanks to xda forum members [Bin4ry] who always try their best to make the Android OS looks better in its performance and customization. So, here we go please read this tutorial carefully. The choice between rooting or not lies on your hand.


Caution: In my experience nothing has ever gone wrong with rooting. There is always that slight chance something can mess up. Use caution and only do this if you want to. I am not responsible if anything happens (but I really don’t think anything will happen if you do everything right)  Also rooting voids your warranty but don’t worry, unrooting should give it back like nothing ever happened.!! Please read about Rooting here.

Note:
  • The instructions in this guide are intended for use with the Sony Xperia Acro S.  Applying these instructions on another device or model may produce undesired outcomes.
  • The information in this guide is provided for instructional and educational purposes only. There is no guarantee that these instructions will work under your specific and unique circumstances.
  • Use these instructions at your own risk. We shall not hold any responsibility or liability for whatever happens to you or your device arising from your use of the info in this guide.
  • Read and understand the whole guide first before actually performing the instructions.
  • This Procedure will definitely void your warranty, although the warranty can be claimed by un-rooting your device.


What you need to prepare:
  • A Sony Xperia Acro S and a PC
  • Backup all personal data on your phone to make sure you have a copy of your personal data (e.g., contacts, SMS, MMS, Internet settings, Wi-Fi passwords, and the like) in case the procedure in this guide erases such data. Guide from here
  • Make sure your device has at least 75% of phone battery charge.


How to root using Bin4ry’s Root Tool
  • Download the tool from here. (mirror mediafire)
  • Extract the downloaded zip file to a convenient location on the computer.
  • Ensure that you are running an android OS of ICS or JB on your device. This will not work on Android 2.3 or older versions of Android.
  • Make sure drivers for your Android device are installed on the computer. Drivers for most devices can be installed by installing the manufacturer’s PC suite software.
  • On your phone/tablet, enable USB debugging in the Settings » Developer options menu.
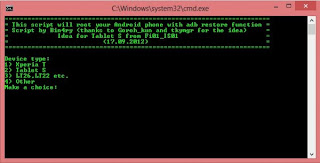
  • Run the tool by double-clicking the RunMe.bat file from the folder where you extracted the tool in step 2.
  • Then, make the correct choice according to whatever device you have.
  • Connect your device to the computer. Then, follow on-screen instructions to root your device.

Note:
Xperia phones with "older" firmware = Normal mode
Sony Tablet and similar = Special mode
Xperia phones with JB Firmare = Mode 3

Notice:
  • Normal Mode will not wipe any other data, dont worry!
  • Special Mode CAN wipe your data, Rollback SHOULD restore, but to be sure backup you data somehow!
  • New Mode SHOULD be able to root all new Sony Firmwares like 2.55 and higher where Normal mode was failing

Congratulation ! now your Sony Xperia Acro S has been rooted. Enjoy the advantages of the rooted device. Please give us a feedback on the comment section below.

How to Root Sony Xperia P Using Bin4ry’s Root Tool


On this article i will explain a tutorial about how to root Sony Xperia P using a famous tool made by a member of xda-forum which is called Bin4ry Tool. 

Thanks to xda forum members [Bin4ry] who always try their best to make the Android OS looks better in its performance and customization. So, here we go please read this tutorial carefully. The choice between rooting or not lies on your hand.


Caution: In my experience nothing has ever gone wrong with rooting. There is always that slight chance something can mess up. Use caution and only do this if you want to. I am not responsible if anything happens (but I really don’t think anything will happen if you do everything right)  Also rooting voids your warranty but don’t worry, unrooting should give it back like nothing ever happened.!! Please read about Rooting here.

Note:
  • The instructions in this guide are intended for use with the Sony Xperia P  Applying these instructions on another device or model may produce undesired outcomes.
  • The information in this guide is provided for instructional and educational purposes only. There is no guarantee that these instructions will work under your specific and unique circumstances.
  • Use these instructions at your own risk. We shall not hold any responsibility or liability for whatever happens to you or your device arising from your use of the info in this guide.
  • Read and understand the whole guide first before actually performing the instructions.
  • This Procedure will definitely void your warranty, although the warranty can be claimed by un-rooting your device.


What you need to prepare:
  • A Sony Xperia P and a PC
  • Backup all personal data on your phone to make sure you have a copy of your personal data (e.g., contacts, SMS, MMS, Internet settings, Wi-Fi passwords, and the like) in case the procedure in this guide erases such data. Guide from here
  • Make sure your device has at least 75% of phone battery charge.


How to root using Bin4ry’s Root Tool
  • Download the tool from here. (mirror mediafire)
  • Extract the downloaded zip file to a convenient location on the computer.
  • Ensure that you are running an android OS of ICS or JB on your device. This will not work on Android 2.3 or older versions of Android.
  • Make sure drivers for your Android device are installed on the computer. Drivers for most devices can be installed by installing the manufacturer’s PC suite software.
  • On your phone/tablet, enable USB debugging in the Settings » Developer options menu.
  • Run the tool by double-clicking the RunMe.bat file from the folder where you extracted the tool in step 2.
  • Then, make the correct choice according to whatever device you have.
  • Connect your device to the computer. Then, follow on-screen instructions to root your device.

Note:
Xperia phones with "older" firmware = Normal mode
Sony Tablet and similar = Special mode
Xperia phones with JB Firmare = Mode 3


Notice:
  • Normal Mode will not wipe any other data, dont worry!
  • Special Mode CAN wipe your data, Rollback SHOULD restore, but to be sure backup you data somehow!
  • New Mode SHOULD be able to root all new Sony Firmwares like 2.55 and higher where Normal mode was failing

Congratulation ! now your Sony Xperia P has been rooted. Enjoy the advantages of the rooted device. Please give us a feedback on the comment section below.

Sony Xperia Z Specs: Advantages and Disadvantages


Another monster has came out to beat the others. While Samsung also releases its monster Galaxy S4, HTC with their One, and many others, so this must be the best time in a while to be a Sony fan. The year since parting ways with Ericsson has been one of filling in the blanks - fulfilling fans' wildest dreams was not too high on the agenda. This is not to say that the brand's loyal followers were let down over and over again. It's just that they had to teach themselves patience. Well, those who did have their reward at last.

The Xperia Z is a burst of confidence and inspiration that will rally the troops and send a warning to the opposition. Another message is delivered too, loud and clear: Ericsson is no longer a haunting shadow. Sony has moved on.

The Sony Xperia Z is stuff geeks' dreams are made of, it's designed and built to the highest standard and has raw processing power to spare. IP57-certified - on top of that - for dust and water resistance, it's tougher than most competitors. High-end smartphones aren't quite fit for the beach or white water rafting, but the Xperia Z won't be at odds with your active lifestyle.


Sony Xperia Z Specs:

Quad-band GSM/GPRS/EDGE support; 3G with HSPA; LTE
5" 16M-color 1080p capacitive touchscreen with 441ppi pixel density; Bravia Mobile Engine 2
Android OS v4.1.1 Jelly Bean with custom UI
Quad-core 1.5 GHz Krait CPU, 2 GB RAM, Adreno 320 GPU; Qualcomm Snapdragon S4 Pro chipset
13 MP autofocus camera with LED flash and geo-tagging, HDR
1080p video recording @ 30fps with HDR mode, continuous autofocus and stereo sound
2.2 MP front-facing camera, 1080p video recording
IP 57 certification - dust resistant and water resistant
Wi-Fi a/b/g/n, Wi-Fi Direct and DLNA; Wireless TV out
GPS with A-GPS, GLONASS
16GB of built-in storage; microSD card slot
Non-removable Li-Ion 2330 mAh battery
MHL-enabled microUSB port
Bluetooth v4.0, NFC
Standard 3.5 mm audio jack
Accelerometer and proximity sensor
Active noise cancellation with dedicated mic
Glass front and back panels

Main Advantages

Sony has managed to extract more performance from the four Krait cores than any manufacturer to use this chipset. The Adreno 320 GPU does equally well - it manages playable frame rates using a real-world 3D engine at FullHD resolution. It's hardly a surprise then, that the overall user experience with this one is smooth as butter.

The Sony Xperia Z also comes with the second version of the company's Mobile Bravia Engine, which should improve its performance for video playback and image browsing. Thanks to that and the immense resolution, the Xperia Z has easily the best smartphone display the Japanase have produced so far. It is also the least reflective so far, which helps it perform much better in bright sunlight. Here's how it did in our dedicated sunlight legibility test.

On top you get another plastic lid with the 3.5mm audio jack hiding underneath. While the cover prevents dust and dirt accumulation (in addition of keeping water out), it does have a somewhat negative effect on its accessibility.

The smartphone has a large 2330 mAh battery to rely on, but the quad-core Krait CPU and the 5″ 1080p display are known to consume quite a lot of power. The fact that the battery isn’t user-replaceable puts even more pressure on the Xperia Z to do well here, and we were as curious as you are to find out if that’s actually the case.

Here is the test result done by GSMarena


Main Disadvantage

Low contrast display with below-par viewing angles
the screen is by no means perfect. First of all its viewing angles aren't really great. They are a step forward compared to the Xperia T, but a very minor one. In that area Sony still has a lot of work before it catches up with the competition.

The display has rather poor contrast for a flagship unit and not really inspiring colors. As testified by the measurements in our dedicated test it comes nowhere near the standard of its main competitors and it even fared worse than its predecessor.

Non user-replaceable battery
Unfortunately Sony Xperia Z even come with the great amazing battery, but it hardly can be removed by users. If we want to change or remove the battery, we should go to the service.

How to Root Sony Xperia T running on Android 4.0 Ice Cream Sandwich [Tutorial]


Another Xperia series showing up to ready to be rooted. This time we will explain a tutorial about how to root Sony Xperia T which released with an official Android 4.0 Ice Cream Sandwich. Previously we have explained and posted the same tutorial for Xperia which is Sony Xperia S, now for those the owners of Sony Xperia T do not worry not to get the rooting guide.

Thanks to xda forum members who always try their best to make the Android OS looks better in its performance and customization. So, here we go please read this tutorial carefully. The choice between rooting or not lies on your hand.


Caution: In my experience nothing has ever gone wrong with rooting. There is always that slight chance something can mess up. Use caution and only do this if you want to. I am not responsible if anything happens (but I really don’t think anything will happen if you do everything right)  Also rooting voids your warranty but don’t worry, unrooting should give it back like nothing ever happened.!! Please read about Rooting here.

Note:
  • The instructions in this guide are intended for use with the Sony Xperia T running on Android 4.0 Ice Cream Sandwich. Applying these instructions on another device or model may produce undesired outcomes.
  • The information in this guide is provided for instructional and educational purposes only. There is no guarantee that these instructions will work under your specific and unique circumstances.
  • Use these instructions at your own risk. We shall not hold any responsibility or liability for whatever happens to you or your device arising from your use of the info in this guide.
  • Read and understand the whole guide first before actually performing the instructions.
  • This Procedure will definitely void your warranty, although the warranty can be claimed by un-rooting your device.


What you need to prepare:
  • A Sony Xperia T running on Android 4.0 Ice Cream Sandwich and a PC
  • Backup all personal data on your phone to make sure you have a copy of your personal data (e.g., contacts, SMS, MMS, Internet settings, Wi-Fi passwords, and the like) in case the procedure in this guide erases such data. Guide from here
  • Make sure your device has at least 75% of phone battery charge.


How to root using Bin4ry’s Root Tool
  • Download the tool from here.
  • Extract the downloaded zip file to a convenient location on the computer.
  • Ensure that you are running an Android 4.0 or Android 4.1 ROM on your device. This will not work on Android 2.3 or older versions of Android.
  • Make sure drivers for your Android device are installed on the computer. Drivers for most devices can be installed by installing the manufacturer’s PC suite software.
  • On your phone/tablet, enable USB debugging in the Settings » Developer options menu.
  • Run the tool by double-clicking the RunMe.bat file from the folder where you extracted the tool in step 2.
  • Then, make the correct choice according to whatever device you have (enter 4 for the normal method which is to be used for all non-Sony devices), then press Enter.
  • Connect your device to the computer. Then, follow on-screen instructions to root your device.

Congratulation ! now your Sony Xperia T has been rooted. Enjoy the advantages of the rooted device. Please give us a feedback on the comment section below.

How to Root Sony Xperia S running on Android 4.0 Ice Cream Sandwich [Tutorial]


Sony Xperia S is one of the best smartphones on the market so far. It is released with the official Android 2.3 Gingerbread, but lately it is planed to updagre to Android 4.0 Ice Cream Sandwich. For those who have Sony Xperia S running on Android 4.0 Ice Cream Sandwich and want to root their device, on this article i will show you how to root the Sony Xperia S using one amazing tool called Bin4ry's root tool.

Thanks to xda forum members who always try their best to make the Android OS looks better in its performance and customization. So, here we go please read this tutorial carefully. The choice between rooting or not lies on your hand.


Caution: In my experience nothing has ever gone wrong with rooting. There is always that slight chance something can mess up. Use caution and only do this if you want to. I am not responsible if anything happens (but I really don’t think anything will happen if you do everything right)  Also rooting voids your warranty but don’t worry, unrooting should give it back like nothing ever happened.!! Please read about Rooting here.

Note:
  • The instructions in this guide are intended for use with the Sony Xperia S running on Android 4.0 Ice Cream Sandwich. Applying these instructions on another device or model may produce undesired outcomes.
  • The information in this guide is provided for instructional and educational purposes only. There is no guarantee that these instructions will work under your specific and unique circumstances.
  • Use these instructions at your own risk. We shall not hold any responsibility or liability for whatever happens to you or your device arising from your use of the info in this guide.
  • Read and understand the whole guide first before actually performing the instructions.
  • This Procedure will definitely void your warranty, although the warranty can be claimed by un-rooting your device.


What you need to prepare:
  • A Sony Xperia S running on Android 4.0 Ice Cream Sandwich and a PC
  • Backup all personal data on your phone to make sure you have a copy of your personal data (e.g., contacts, SMS, MMS, Internet settings, Wi-Fi passwords, and the like) in case the procedure in this guide erases such data. Guide from here
  • Make sure your device has at least 75% of phone battery charge.


How to root using Bin4ry’s Root Tool
  • Download the tool from here.
  • Extract the downloaded zip file to a convenient location on the computer.
  • Ensure that you are running an Android 4.0 or Android 4.1 ROM on your device. This will not work on Android 2.3 or older versions of Android.
  • Make sure drivers for your Android device are installed on the computer. Drivers for most devices can be installed by installing the manufacturer’s PC suite software.
  • On your phone/tablet, enable USB debugging in the Settings » Developer options menu.
  • Run the tool by double-clicking the RunMe.bat file from the folder where you extracted the tool in step 2.
  • Then, make the correct choice according to whatever device you have (enter 4 for the normal method which is to be used for all non-Sony devices), then press Enter.
  • Connect your device to the computer. Then, follow on-screen instructions to root your device.

Congratulation ! now your Sony Xperia S has been rooted. Enjoy the advantages of the rooted device. Please give us a feedback on the comment section below.

How to Unlocking Bootloader on Sony Xperia W8 Using SE Tweaker Tool (Tutorial)


How to Unlocking Bootloader on Sony Xperia W8 Using SE Tweaker Tool (Tutorial)

After i posted the way to unlocking the bootloader of the Sony Xperia X8 on this post, this time i will explain about how to Unloackig Bootloader of the Sony Xperia W8. The tutorial is a little bit same of the previous tutorial.

SE Tweaker Tool is a Tool + Guide to make some tweaks to ur phone With ease which includes of all the necessary utilities for many devices. Unlocking the bootloader of your phone will restore the original sim lock of your phone (if you had any) unless if you unlocked with EMMA/IMEI unlock code or it was factory-unlocked or if SE unlocked it! However, some users have reported that using msm7227_semc.cmd on their sim-unlocked phones did not restore the sim lock onto their phone.

Read this before doing Unlocking Bootloader

NOTE: Dealing with the bootloader is highly dangerous and can result in a hard brick if you don't follow the proper instructions. Then, you will have to go and repair your phone by sending it to SE. I am not responsible if your phone dies on you because you didn't follow instructions or you screwed up somehow. Unlock the bootloader on your sim unlocked phone AT YOUR OWN RISK!

Only For people getting error related iscoolbutton.ocx.. Just Run the ocx_fix.bat in the downloaded tool and then Run the SE Tweaker Tool..

Requirements: 
  • Rooted phone, Sony Ericsson PC Companion installed in PC, Courage
  • You do not need to have a sim lock on your phone to unlock your Bootloader.

Recommended:
  • Disable your Antivirus (it might find a "virus" in ADB.exe even though there isn't one and might even interfere in bootloader unlocking process) 
  • USB debugging enabled.

Download the files needed for the unlock.
  • Download Flashtool (needed for S1tool to work properly and for loading custom kernels next time) and install it (not necessary if you already have Flashtool):
  • Download and install Flashtool v0.5.3 here (follow instructions on the website).
  • After installing it, open the flashtool folder and open the drivers folder inside that. Double click on the ggsetup-2.2.0.11.exe file inside and install Gordon's Gate.
  • Then restart your computer. if you dont Find GORDAN'S gate.exe in the drivers folder download it from my attachments.

Steps To unlock Bootloader:
  • After installing Gordans Gate and the flashtool Turn off your phone.
  • Download SE Tweaker Tool also Mirror[Mediafire] and unzip it.
  • Run SE_Tweaker_Tool.exe from it.
  • NOTE: If no flashtool download from the dialog box appeared after running unlockbootloader.exe
  • Turn off ur phone
  • Select unlock_bootloader button.. run S1tool button to check if the your phone has SIM UNLOCK CERTIFICATE.[i.e click on "Do" in s1tool and compare the output]
  • Boot your phone into flash mode (make sure you installed Gordon's Gate and usb debugging is on). All users, press and hold back button while connecting cable from PC to phone. Continue holding back button until you get some output. The LED on your phone should flash green if it is in flash mode.
  • Click on how it should look.. it will give u an idea how the output will be..
  • NOTE- At this moment you should know if you have SIM UNLOCK CERTIFICATE or what ever the output was.. keep that in mind.. 
  • Now disconnect[/COLOR] your phone n boot it up.Connect it again to PC (make sure your USB DEBUGGING is enabled and antivirus is disabled) 
  • Now click the check box which is right for you [Read them carefully it will be according to the output you got with s1tool] run the corressponding button.. 
  • After it proceed to check if the unlocking of bootloader was done by clicking Check If your "Bootloader is unlocked And Proceed" button..
  • Reboot your phone to flashmode as before.. Run s1tool.. N compare the output.. 

If the line RUNNING S1_EROM FROM VER "#8A02$" has a lowercase "r" letter replacing the "#" (RUNNING S1_EROM FROM VER "r8A02$"), your bootloader has been unlocked . If it has an uppercase "R" replacing the "#" (RUNNING S1_EROM FROM VER "R8A02$"), your bootloader is NOT unlocked.


Re-locking the Bootloader Follow the steps in the Tool

DOWNLOAD THE KERNEL WHICH YOU WANT
[Note: If it is downloaded in *.zip or *.rar format just open with any zip tool like Winrar or 7zip tool n extract the *.ftf file to your drive n later put in into the /firmwares folder of flashtool and follow below steps to Flash]

How to flash custom kernels:
  • Put the *.ftf file in the /firmwares folder. ( flash only the .ftf file.)
  • Open Flashtool.
  • Click Flash.
  • Select (kernel name).ftf.
  • Turn off your phone.
  • Connect your phone in flash mode (only when the popup window prompts for you to do so). (To boot into flash mode, press and hold back button while connecting your phone to the PC using an usb cable).
  • Disconnect your phone (do so only when the popup window to prompts you to disconnect your phone).
  • Reboot and you have a custom kernel! 
  • Confirm by going to Settings --> About Phone --> Kernel version. It should have the name of the kernel you flashed.
To flash back to stock kernel, download the file here and follow steps listed above.


How to Unlocking Bootloader on Sony Xperia X8 Using SE Tweaker Tool (Tutorial)


SE Tweaker Tool is a Tool + Guide to make some tweaks to ur phone With ease which includes of all the necessary utilities for many devices. Unlocking the bootloader of your phone will restore the original sim lock of your phone (if you had any) unless if you unlocked with EMMA/IMEI unlock code or it was factory-unlocked or if SE unlocked it! However, some users have reported that using msm7227_semc.cmd on their sim-unlocked phones did not restore the sim lock onto their phone.

Read this before doing Unlocking Bootloader

NOTE: Dealing with the bootloader is highly dangerous and can result in a hard brick if you don't follow the proper instructions. Then, you will have to go and repair your phone by sending it to SE. I am not responsible if your phone dies on you because you didn't follow instructions or you screwed up somehow. Unlock the bootloader on your sim unlocked phone AT YOUR OWN RISK!

Only For people getting error related iscoolbutton.ocx.. Just Run the ocx_fix.bat in the downloaded tool and then Run the SE Tweaker Tool..

Requirements: 
  • Rooted phone, Sony Ericsson PC Companion installed in PC, Courage
  • You do not need to have a sim lock on your phone to unlock your Bootloader.

Recommended:
  • Disable your Antivirus (it might find a "virus" in ADB.exe even though there isn't one and might even interfere in bootloader unlocking process) 
  • USB debugging enabled.

Download the files needed for the unlock.
  • Download Flashtool (needed for S1tool to work properly and for loading custom kernels next time) and install it (not necessary if you already have Flashtool):
  • Download and install Flashtool v0.5.3 here (follow instructions on the website).
  • After installing it, open the flashtool folder and open the drivers folder inside that. Double click on the ggsetup-2.2.0.11.exe file inside and install Gordon's Gate.
  • Then restart your computer. if you dont Find GORDAN'S gate.exe in the drivers folder download it from my attachments.

Steps To unlock Bootloader:
  • After installing Gordans Gate and the flashtool Turn off your phone.
  • Download SE Tweaker Tool also Mirror[Mediafire] and unzip it.
  • Run SE_Tweaker_Tool.exe from it.
  • NOTE: If no flashtool download from the dialog box appeared after running unlockbootloader.exe
  • Turn off ur phone
  • Select unlock_bootloader button.. run S1tool button to check if the your phone has SIM UNLOCK CERTIFICATE.[i.e click on "Do" in s1tool and compare the output]
  • Boot your phone into flash mode (make sure you installed Gordon's Gate and usb debugging is on). All users, press and hold back button while connecting cable from PC to phone. Continue holding back button until you get some output. The LED on your phone should flash green if it is in flash mode.
  • Click on how it should look.. it will give u an idea how the output will be..
  • NOTE- At this moment you should know if you have SIM UNLOCK CERTIFICATE or what ever the output was.. keep that in mind.. 
  • Now disconnect[/COLOR] your phone n boot it up.Connect it again to PC (make sure your USB DEBUGGING is enabled and antivirus is disabled) 
  • Now click the check box which is right for you [Read them carefully it will be according to the output you got with s1tool] run the corressponding button.. 
  • After it proceed to check if the unlocking of bootloader was done by clicking Check If your "Bootloader is unlocked And Proceed" button..
  • Reboot your phone to flashmode as before.. Run s1tool.. N compare the output.. 

If the line RUNNING S1_EROM FROM VER "#8A02$" has a lowercase "r" letter replacing the "#" (RUNNING S1_EROM FROM VER "r8A02$"), your bootloader has been unlocked . If it has an uppercase "R" replacing the "#" (RUNNING S1_EROM FROM VER "R8A02$"), your bootloader is NOT unlocked.


Re-locking the Bootloader Follow the steps in the Tool

DOWNLOAD THE KERNEL WHICH YOU WANT
[Note: If it is downloaded in *.zip or *.rar format just open with any zip tool like Winrar or 7zip tool n extract the *.ftf file to your drive n later put in into the /firmwares folder of flashtool and follow below steps to Flash]

How to flash custom kernels:
  • Put the *.ftf file in the /firmwares folder. ( flash only the .ftf file.)
  • Open Flashtool.
  • Click Flash.
  • Select (kernel name).ftf.
  • Turn off your phone.
  • Connect your phone in flash mode (only when the popup window prompts for you to do so). (To boot into flash mode, press and hold back button while connecting your phone to the PC using an usb cable).
  • Disconnect your phone (do so only when the popup window to prompts you to disconnect your phone).
  • Reboot and you have a custom kernel! 
  • Confirm by going to Settings --> About Phone --> Kernel version. It should have the name of the kernel you flashed.
To flash back to stock kernel, download the file here and follow steps listed above.


How to Update Sony Ericsson Xperia X8 into Android 4.04 (Ice Cream Sandwich)


Hello guys, do you want to taste having Ice Cream Sandwich on your Xperia X8. If you do, then i will explain the tutorial How to Update Sony Ericsson Xperia X8 into Android 4.04 (Ice Cream Sandwich). You should know that this tutorial will use MiniCM9 which is an unofficial port of CyanogenMod 9 for the SEMC msm7x27 devices. MiniCM9 is running Android ICS on top of the nAa-ics kernel.

Features:
  • Built for MDPI
  • Full hardware acceleration (the ICS way)
  • Camera
  • Opengl rendering
  • MiniCM Update notifications via c2dm (Settings -> System -> Update notifications)
  • App2sd / Dalvik2sd compatible with 2.1 app2sd (storing to ext2/3/4 pre-existing partition is detected and mounted as such)
  • Android's native App2sd (move to sdcard, storing to fat)
  • In kernel ClockworkMod recovery v5.0.2.3 and option to reboot into Recovery
  • Modular Undervolting handled Settings -> Performance menu (by default not active)
  • KSM support
  • Extra Settings display option for Ultra brightness, also handled via notification bar icons
  • Smooth 2D scrolling in menus
  • Native Wifi Hotspot
  • Native USB tethering
  • Native Bluetooth tethering

Not Working:
  • HW Video encoding / decoding

Note:
  • The instructions in this guide are intended for use with the Sony Xperia X8. Applying these instructions on another device or model may produce undesired outcomes.
  • The information in this guide is provided for instructional and educational purposes only. There is no guarantee that these instructions will work under your specific and unique circumstances.
  • Use these instructions at your own risk. We shall not hold any responsibility or liability for whatever happens to you or your device arising from your use of the info in this guide.
  • Read and understand the whole guide first before actually performing the instructions.

This installation requires you to have:

Before installation of Android 4.04 on you X8, it is better to back up your phone to keep your files and data setting on your phone save. Make sure you have rooted your X8 and xRecovery is installed on your phone. The back up process we use now is using the tutorial below using xRecovery from the files above. For the tutorial to back up your X8, follow the link below:
How to Backup Your OS Android Phones Using xRecovery
Make sure that your battery has a charge of at least 80% to prevent your device from shutting down in the middle of the update process.After you backup your files from your phone, follow these steps below:

Instructions:
  • Download the MiniCM9-3.0.4.zip from the release link 
  • Backup your /data contents: contacts, apps, sms, etc. or backup via x-recovery above
  • Move the MiniCM9-3.0.4.zip  to the root folder of your sdcard. Download the suggested Google Apps for CM9 from here (check http://goo-inside.me/gapps/ if you want to experiment with other gapps versions)
  • Make sure you are using the nAa-ics kernel
  • Enter CWM and:
  • - Select 'backup and restore -> Backup'
  • - Select 'wipe data/factory reset' (MUST DO)
  • - Flash the MiniCM9-3.0.4.zip  To do this, Select 'install zip from sdcard -> choose zip from sdcard' and select the MiniCM9-3.0.4.zip
  • - Flash gapps in the same way
  • Reboot (first boot will take ~2 mins)
  • Once your device has booted, you can use the nAa notification to register for upcoming updates. This way you can get update notifications on new versions of MiniCM9 and the nAa-ics kernel!
Congratulation! Now you have Android 4.04 Ice Cream Sandwich on your phone. Feel free to leave a comment on the section below.

How to Update Sony Xperia Mini X10 to Android 4.1 (Jelly Bean) Using Alpha 2


Apparently the developers can't wait for the official of Sony Mobile to announce the release of official update for the Sony Xperia Mini X10. Ufortunately there is no oficial update for the device on the Jelly Bean. Therefore, here is the unofficial tutorial to update your Xperia Mini X10 to Android 4.1 (Jelly Bean) Using Alpha 2.

What we may need to know is the latest Android OS 4.1 Jelly Bean is working great on the device even though there are still many features can't working perfectly, but the Alpha is still under development. So, for those who curious to taste the feel of Jelly Bean on their Mini X10, just follow the tutorial below.

This is not an official ROM and hence you need to wipe data to get this working on your device. Wiping data helps you prevent low memory issues and force closes. Before you wipe data on your device, make sure you backup all important data using the steps given in the Prerequisites section.

Before you proceed with the installation, make sure you have rooted your phone, installed ClockworkMod Recovery and unlocked the bootloader.

Working features:

Display
Touchscreen
Bluetooth
HW Acceleration
Usb (Storage and Adb)
Charging
Sensors
Vibration
GPS
Lockscreen
SuperUser
Gallery
Take Screenshot
Hardware Keys
New Adreno200 Libs
Terminal
GSM
Data
Lights
WiFi

Not Working features:


Music playing
Ringer
Notification
In call mic
FM Radio
Camera
Mic
Project Butter
HW video encoder/decoder
Audio/Video Playback
More

Warning
  • The instructions in this guide are intended for use with the Sony Xperia Mini X10. Applying these instructions on another device or model may produce undesired outcomes.
  • The information in this guide is provided for instructional and educational purposes only. There is no guarantee that these instructions will work under your specific and unique circumstances.
  • Use these instructions at your own risk. We shall not hold any responsibility or liability for whatever happens to you or your device arising from your use of the info in this guide.
  • Read and understand the whole guide first before actually performing the instructions.

What you need to prepare:
  • Before installation of Jelly Bean on your Sony Xperia Mini X10, it is better to back up your phone to keep your files and data setiing on your phone save. Make sure you have rooted your Sony Xperia Mini X10 and xRecovery is installed on your phone. The back up process we use now is using the tutorial below using xRecovery from the files above. For the tutorial to back up your Sony Xperia Mini X10, follow the link here
  • Make sure that your battery has a charge of at least 80% to prevent your device from shutting down in the middle of the update process. After you backup your phone, now follow the steps below carefully to avoid any unwanted thing to your phone:

Steps to upgrade the Android 4.1 Jelly Bean on Sony Xperia Mini X10
  • Download the ROM zip file and Kernel ftf file from here and here 
  • Connect your phone to the SD card and copy the ROM zip file from the Computer to your SD card, preferably in the root folder and not within any folder deep inside.
  • Having USB Debugging enabled and the necessary drivers installed, place the ftf kernel file in the firmwares directory.
  • Use the flashtool to flash the ftf file to your device.
  • After flashing the kernel, turn off your phone and boot it into recovery mode You can use the commandadb reboot recovery to reboot into recovery mode.
  • In recovery mode, wipe all data, cache and dalvik cache.
  • Go to “install zip from SD card”>”Choose zip from SD card” and select the ROM zip file.
  • Go back and select “Reboot system now”.
  • To get Market and other Google apps working, you can flash Gooogle Apps zip file which can be obtained from goo.im/gapps
Congratulation, now your Sony Xperia Mini X10 has been updated to the latest Android Jelly Bean, feel free to leave the comment below.

Sony Xperia Tipo, the Entry-level ICS Droid Phone

Sony Mobile eventually expands their smartphones to launch another type of Xperia Phone, called Sony Xperia Tipo. This entry level ICS droid phone will surprise us as it will compete with another android phone in low level smartphone priced in such affordable price.

Sony Xperia Tipo, the Entry-level ICS Droid Phone
The Xperia tipo is a compact phone (103 x 57 x 13 mm, 99.4g) and features a 3.2" HVGA TFT screen with scratch-resistant mineral glass. It will run Android 4.0 Ice Cream Sandwich at launch, and is powered by an 800MHz processor (Qualcomm Snapdragon MSM7225AA chipset).

The phone has the essentials - a 3.2MP camera, 2.9GB of built-in memory (expandable by a microSD card), 3.5mm audio jack, microUSB port and a 1500mAh battery. On the connectivity side, there's HSPA-enabled 3G, Bluetooth, Wi-Fi and GPS.

As we may consider to buy this phone is the features presented on it. It will compete with Samsung phones, such as Samsung Galaxy Young or Gio. In order to choose the better phone run on Android operating system, Sony Xperia Tipo is the right option. But, we have to wait to get this one, because this phone is not released yet.

Features:
  • Android OS, v4.0.3 (Ice Cream Sandwich)
  • Chipset Qualcomm MSM7227A
  • CPU 800 MHz, GPU Adreno 200
  • 2G Network GSM 850 / 900 / 1800 / 1900
  • 3G Network HSDPA 900 / 2100 - ST21i
  • HSDPA 850 / 1900 / 2100 - ST21a
  • Dimensions 103 x 57 x 13 mm, Weight 99.4 g
  • Type TFT capacitive touchscreen, 256K colors
  • Size 320 x 480 pixels, 3.2 inches (~180 ppi pixel density)
  • Multitouch, Protection Scratch-resistant glass
  • Vibration; MP3 ringtones, Loudspeaker, 3.5mm jack
  • Card slot microSD, up to 32 GB
  • Internal 2.9 GB storage (2.5 GB user available), 512 MB RAM
  • GPRS Up to 86 kbps, EDGE Up to 237 kbps
  • Speed HSDPA, 7.2 Mbps; HSUPA, 5.76 Mbps
  • Wi-Fi 802.11 b/g/n, Wi-Fi hotspot
  • Bluetooth v2.1 with A2DP, microUSB v2.0
  • CAMERA Primary 3.15 MP, 2048x1536 pixels, Geo-tagging, Video VGA
  • Sensors Accelerometer, proximity, compass
  • Messaging SMS (threaded view), MMS, Email, IM, Push Email
  • Browser HTML, Radio Stereo FM radio with RDS
  • GPS with A-GPS support, Java via Java MIDP emulator
  • Colors Classic Black, Classic White, Deep Red, Navy Blue
  • SNS integration, MP4/H.264/WMV player
  • MP3/WMA/WAV/eAAC+ player
  • Organizer, Document viewer
  • Voice memo/dial, Predictive text input
  • Standard battery, Li-Ion 1500 mAh
  • Stand-by Up to 470 h (2G) / Up to 545 h (3G)
  • Talk time Up to 5 h (2G) / Up to 4 h 30 min (3G)
  • Music play Up to 30 h
Main disadvantages:
  • No secondary camera
Picture:


Sony Xperia Sola Price and Review, the Floating Touch Display and Stereo Speaker !

Overview:
Introducing the mid-low end Sony mobile called Sony Xperia Sola. In Spanish (Mexico) Sola means "Alone" (Reffering to a female). Sony Xperia Sola is the first mid-low end mobile phones using the features of floating touch display and the stereo speaker, making this smartphone really special comparing with the other Smartphones on the market.

Sony Xperia Sola
Built in stylish design looks like the Xperia S or Xperia P, this Sola is equipped with the operating system of Android v2.3 Gingerbread and planned to upgrade to Android OS v4.0 Ice Cream Sandwich. Looking inside the specs inside the phone, we will find Chipset NovaThor U8500, CPU Dual-core 1 GHz, 512 MB RAM, which are of course the speed is not doubtable to be fast.

Another features on the Sony Xperia Sola are the main camera of 5MP and unfortunately there is no secondary camera available on this device. There is also internal storage of 8GB (5GB user accessible), NFC support, and much more. The battery also put inside on Li-Ion 1320 mAh that is able to play music for 40 hours. Let's take a look inside the phone, below:

Features
  • Android OS, v2.3 (Gingerbread), planned upgrade to v4.0
  • Chipset NovaThor U8500, CPU Dual-core 1 GHz, 512 MB RAM
  • 2G Network GSM 850 / 900 / 1800 / 1900
  • 3G Network HSDPA 850 / 900 / 1900 / 2100
  • Dimensions 116 x 59 x 9.9 mm, Weight 107 g
  • Touch-sensitive controls, Capacitive touchscreen, 16M colors
  • Size 480 x 854 pixels, 3.7 inches (265 ppi pixel density)
  • Multitouch, Protection Scratch-resistant glass
  • Floating touch display
  • 3.5mm jack, Card slot
  • Internal 8 GB (5GB user accessible), 
  • GPRS, EDGE 
  • Speed HSDPA, HSUPA
  • Wi-Fi 802.11 b/g/n, DLNA, Wi-Fi hotspot
  • Bluetooth v2.1 with A2DP, EDR
  • NFC, microUSB v2.0
  • Camera Primary 5 MP, 2592Ñ…1944 pixels, autofocus, LED flash
  • Features Geo-tagging, touch focus, face and smile detection, 3D sweep panorama, image stabilization
  • Video 720p@30fps, continuous autofocus, video light
  • Sensors Accelerometer, proximity, compass
  • SMS (threaded view), MMS, Email, IM, Push Email
  • Browser HTML5, Adobe Flash
  • Stereo FM radio with RDS
  • GPS, Java MIDP emulator
  • Colors Black, White, Red
  • SNS integration
  • Active noise cancellation with dedicated mic
  • MP4/H.263/H.264/WMV player
  • MP3/eAAC+/WMA/WAV player
  • Google Search, Maps, Gmail,
  • YouTube, Calendar, Google Talk
  • Document viewer
  • Voice memo/dial/commands
  • Predictive text input
  • Standard battery, Li-Ion 1320 mAh
  • Stand-by Up to 470 h (2G) / Up to 475 h (3G)
  • Talk time Up to 6 h (2G) / Up to 5 h (3G)
  • Music play Up to 40 h
Main disadvantages issues:
  • No HDMI
  • No secondary camera
  • The battrey should be more
Prices:

Coming soon

Gallery:


Video:

Sony Xperia U Price and Review, not Sure of the 4GB Internal Storage enough !

Overview:
Another Xperia has been announced to us and will be released soon. This 3.5" Inch Xperia called Sony Xperia U will be featured with amazing specs and great features inside the phone together with the other newest Xperia phones, including the Xperia S and Xperia P, which are almost in the same design and look, not performance.

Sony Xperia U Price and Review
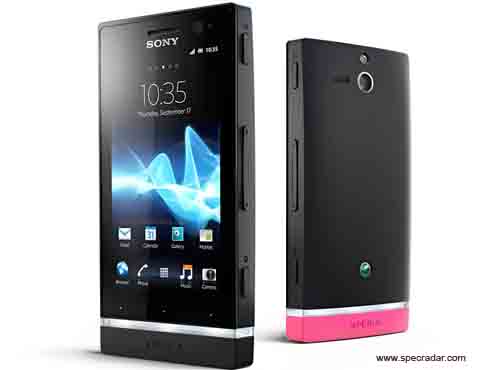
Sony Xperia U is equipped with Dual-core 1GHz and GPU DB8500, as it is on the Xperia P, but the RAM is different in which only presented with 512 MB. The phone also equipped with 5 MP camera and secondary VGA. This phone is fast enough to run with the operating system of Android 2.3 Gingerbread, which planned to upgrade to ICS.

Another interesting features included on this Xperia U are the SNS integration, Multitouch up to 4 fingers, Sony Mobile BRAVIA Engine and 4GB internal storage. There has been question, is this internal storage enough to save files? in which the phone is not included with card slot. However, this Xperia U will hit the market surely for the price that rumored to be cheap enough. Let's take a look inside the phone, below:

Features
  • 2G Network GSM 850 / 900 / 1800 / 1900
  • 3G Network HSDPA 900 / 2100 - ST25i
  • HSDPA 850 / 1900 / 2100 - ST25a
  • LED-backlit LCD, capacitive touchscreen, 16M colors
  • Size 480 x 854 pixels, 3.5 inches (~280 ppi pixel density)
  • Multitouch up to 4 fingers
  • Protection Scratch-resistant glass
  • Sony Mobile BRAVIA Engine
  • Timescape UI
  • 3.5mm jack
  • Android OS, v2.3 (Gingerbread), planned upgrade to v4.0
  • Chipset STE U8500, CPU Dual-core 1 GHz, GPU DB8500
  • Internal 4 GB storage, 512 MB RAM
  • GPRS Up to 107 kbps
  • EDGE Up to 296 kbps
  • Speed HSDPA 14.4 Mbps, HSUPA 5.76 Mbps
  • Wi-Fi 802.11 b/g/n, Wi-Fi hotspot, DLNA
  • Bluetooth v2.1 with A2DP, EDR
  • microUSB v2.0, USB On-the-go support
  • Primary 5 MP, 2592 x 1944 pixels, autofocus, LED flash
  • Features Geo-tagging, touch focus, face and smile detection, 3D sweep panorama, image stabilization
  • Video 720p@30fps, video light
  • Secondary VGA
  • Browser HTML5, Adobe Flash
  • Stereo FM radio with RDS
  • GPS and Java
  • Colors Black, White/ exchangeable bottom caps in white, black, pink, yellow
  • SNS integration
  • Active noise cancellation with dedicated mic
  • MP4/H.263/H.264/WMV player
  • MP3/eAAC+/WMA/WAV player
  • Google Search, Maps, Gmail,
  • YouTube, Calendar, Google Talk
  • Organizer
  • Document viewer
  • Voice memo/dial/commands
  • Predictive text input
  • Standard battery, Li-Ion 1320 mAh
  • Stand-by Up to 260 h (2G) / Up to 472 h (3G)
  • Talk time Up to 6 h 36 min (2G) / Up to 5 h 36 min (3G)
  • Music play Up to 45 h
Main disadvantages issues:
  • No card slot
  • The internal memory only 4 GB storage
  • No HDMI support
Prices:

Sony Xperia U is available at the price €259 (347.406 USD).

Gallery:


Video:


Sony Xperia S Price and Review, the 12 MP in FullHD video capture !

Overview:
Introducing the widest screen of newest Xperia made by Sony Mobile Phone (formerly Sony Ericsson) released to us equipped with best and amazing features built in stylish design of aluminium unibody presented in 4.3" Inch screen with transparent strip below the screen.

Sony Xperia S Price and Review
Sony Xperia S comes featured with the operating system of Android 2.3 Gingerbread, which the update come shortly on this year, and 1.5 GHz Dual-core, as well as 1 GB RAM. This phone absolutely fast to run any android apps available on market apps. The 12 MP main camera also made the Xperia S to be one of few phones equipped with this pixel. This phone also able to shot and capture video in HD quality that can be watched from TV thanks to HDMI support.

Other features inlcuded on this series are also similiar with other Xperia, which are NFC connection, TV launcher, SNS integration, 32 GB internal storage, but unfortunately no card slot available on the phone, but surely it is enough to save files, and other interesting features inside. Let's take a look inside the phone, below:

Features:
  • 2G Network GSM 850 / 900 / 1800 / 1900
  • 3G Network HSDPA 900 / 2100 - LT26i
  • HSDPA 850 / 1900 / 2100 - LT26a
  • LED-backlit LCD, capacitive touchscreen, 16M colors
  • Size 720 x 1280 pixels, 4.3 inches (~342 ppi pixel density)
  • Multitouch up to 10 fingers
  • Protection Scratch-resistant glass
  • Sony Mobile BRAVIA Engine, Timescape UI
  • Android OS, v2.3 (Gingerbread), planned upgrade to v4.0
  • Chipset Qualcomm MSM8260 Snapdragon
  • CPU Dual-core 1.5 GHz, GPU Adreno 220
  • Internal 32 GB, 1 GB RAM
  • GPRS Up to 86 kbps
  • EDGE Up to 237 kbps
  • Speed HSDPA, 14.4 Mbps; HSUPA, 5.8 Mbps
  • Wi-Fi 802.11 b/g/n, Wi-Fi Direct, DLNA, Wi-Fi hotspot
  • Bluetooth v2.1 with A2DP, EDR
  • NFC, microUSB v2.0
  • Primary 12 MP, 4000x3000 pixels, autofocus, LED flash
  • Features Geo-tagging, touch focus, face and smile detection, 3D sweep panorama, image stabilization
  • Video 1080p@30fps, continuous autofocus, video light, video stabilizer
  • Secondary 1.3 MP, 720p@30fps
  • Browser HTML5, Adobe Flash
  • Stereo FM radio with RDS
  • GPS with A-GPS support and GLONASS
  • Java MIDP emulator
  • Colors White, Black
  • MicroSIM card support only
  • TV launcher
  • SNS integration
  • HDMI port
  • Active noise cancellation with dedicated mic
  • MP4/H.263/H.264/WMV player
  • MP3/eAAC+/WMA/WAV player
  • TrackID music recognition
  • Google Search, Maps, Gmail,
  • YouTube, Calendar, Google Talk
  • Document viewer
  • Voice memo/dial/commands
  • Predictive text input
  • Standard battery, Li-Ion 1750 mAh
  • Stand-by Up to 450 h (2G) / Up to 420 h (3G)
  • Talk time Up to 7 h 30 min (2G) / Up to 8 h 30 min (3G)
  • Music play Up to 25 h
Main disadvantages
  • No card slot
Prices:

Sony Xperia S is priced at 467.99 EUR (629.625 USD)

Gallery:


Video:


Sony Xperia P Price and Review, Music play Up to 80 hours !

Overview:
Sony Mobile never stops to release their best smartphone on the market. Now, it's time for another Xperia to come on showing the magnificient creature of smartpone built in aluminium unibody presented in 4.0" Inch screen with transparent strip below the screen.

Sony Xperia P Price and Review
Sony Xperia P is featured with the operating system of Android 2.3 Gingerbread and the update will release on the same year. This Xperia P is equipped with Dual-Core 1 GHz and 1 GB RAM, which should be enough to run the lates Android OS ICS. The internal memory offered on this phone is 16 GB which no card slot found on the phone. So, it means we have to accept the memory as it is. 

The best feature that can be done on this phone is the ability to play music up to 80 hours even though the battrey capacity only 1305 mAh, this is beat the Nokia Lumia 900 than can play music up to 60 hours. No such newest features found on this phone in which all are almost similiar with other Xperia phones, except the WhiteMagic technology, which it boosts the brightness of the display by using a fourth subpixel to the traditional RGB setup, namely a white pixel. This is great as older Reality displays had excellent contrast but weren’t very bright.

Features:
  • 2G Network GSM 850 / 900 / 1800 / 1900
  • 3G Network HSDPA 850 / 900 / 1900 / 2100 - LT22i
  • LED-backlit LCD, capacitive touchscreen, 16M colors
  • Size 540 x 960 pixels, 4.0 inches (~275 ppi pixel density)
  • Multitouchup to 4 fingers
  • Protection Scratch-resistant glass
  • Sony WhiteMagic technology
  • Sony Mobile BRAVIA Engine
  • Timescape UI
  • OS Android OS, v2.3 (Gingerbread), planned upgrade to v4.0
  • Chipset STE U8500, CPU Dual-core 1 GHz, with GPU DB8500
  • Internal 16 GB (13 GB user-available), 1 GB RAM
  • 8 MP, 3264x2448 pixels, autofocus, LED flash
  • GPRS Up to 100 kbps
  • EDGE Up to 296 kbps
  • Speed HSDPA 14.4 Mbps, HSUPA 5.76 Mbps
  • Wi-Fi 802.11 b/g/n, Wi-Fi hotspot, DLNA
  • Bluetooth v2.1 with A2DP, EDR
  • NFC and microUSB v2.0, USB On-the-go support
  • Browser HTML5, Adobe Flash
  • Stereo FM radio with RDS
  • GPS, Java
  • Colors Silver, Black, Red
  • SNS integration
  • HDMI port
  • Active noise cancellation with dedicated mic
  • MP4/H.263/H.264/WMV player
  • MP3/eAAC+/WMA/WAV player
  • Google Search, Maps, Gmail,
  • YouTube, Calendar, Google Talk
  • Organizer
  • Document viewer
  • Voice memo/dial/commands
  • Predictive text input
  • Standard battery, Li-Ion 1305 mAh
  • Stand-by Up to 470 h (2G) / Up to 475 h (3G)
  • Talk time Up to 6 h (2G) / Up to 5 h (3G)
  • Music play Up to 80 h
Main disadvantages
  • No card slot
Prices:

Sony Xperia P is priced at €449 (602.723 USD)

Gallery:


Video:


Android 4.0 Beta ROM for Xperia Phones is Available

The information regarding the Xperia updates for the lates Android OS 4.0 Ice Cream Sandwich finally has been announced today. This Android 4.0 Beta ROM is available for the certain handsets of Xperia family that include  Xperia arc S, Xperia neo V and Xperia ray.


This Beta version of ICS has been developed and come with some features that can't be found from the previous alpha ROM released back in December. Insted, this Beta version has been included some features, including:
  • Updated UI – We hope you will be happy to see that we have added a number of UI elements from ICS, as well as some new UI features already introduced in the Xperia™ S we announced in January.
  • Lockscreen and Face Unlock – We have added a shortcut to the camera directly from the lockscreen. Also, when you’re listening to music you can control the music player without unlocking the phone by using the music control icons on the lockscreen. In the coming final ICS upgrade, we will also include the face unlock app from Google for all phones that has a front-facing camera. The Face Unlock feature uses the front-facing camera in combination with advanced object recognition algorithms to provide a new way to unlock the phone. However, since Face Unlock is a Google Mobile Services (GMS) app, it is not included in this ICS beta ROM.
  • Connectivity turned on – Since we published the ICS alpha ROM, the GSM modem and FM radio have passed the certification and type approval, and they are therefore turned on in this ICS beta release. 
  • Updated email client – The UI has been updated, and simplified email management has been added.
  • Quick dial – We have added a quick and easy way for you to make phone calls.
However, this Beta version does not include the usual Google applications, however, such as Gmail, Google Maps, Android Market, etc. but they will be added in the final version.

Source via