On this article i will explain how to root, backup, flash the latest stock image, install drivers, and more option to the Samsung Galaxy Note 2 using a toolkit. All you need to do is just download this free version of toolkit which includes everything you could do possibly to maniputale your Samsung Galaxy Note 2. Thanks to xda-forum members who always develop the Android Operating System to be more handly and amazing.
What you need to know about the functions of this toolkit is below:
- Install drivers automatically
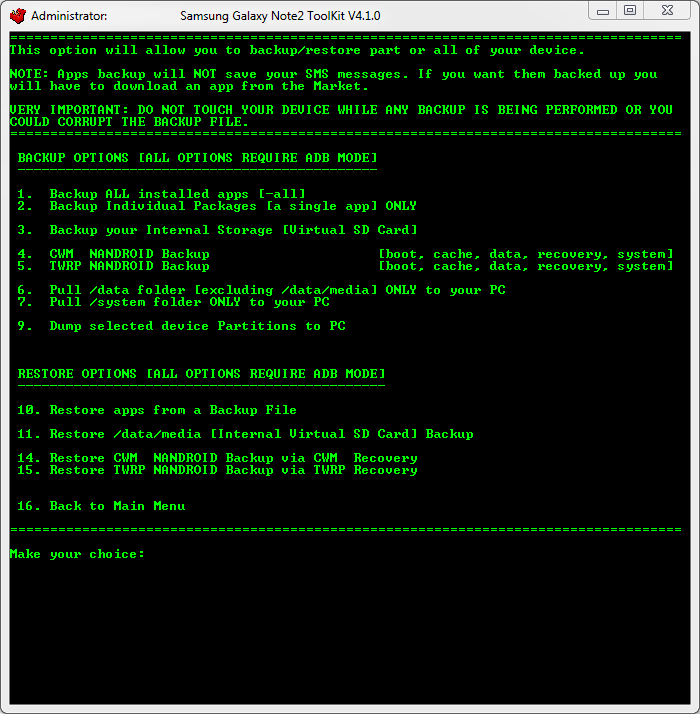
- Backup/Restore a single package or all apps, user data and Internal Storage
- Backup your /data/media (virtual SD Card) to your PC for a Full Safe backup of data
- Perform a FULL NANDROID Backup of your system via adb and save in Custom Recovery format on your PC
- Pull /data and /system folders, compress to a .tar file and save to your PC
- Auto Update ToolKit to latest push version on startup (donator feature)
- Backup/Restore your /efs partition
- Dump selected Phone Partitions, compress to a .zip file with md5 and save to your PC
- Install BusyBox binary on phone
- Root any public build (different options available)
- [B]Root with Superuser (ChainsDD) or SuperSU (Chainfire) via CWM (works on ANY build)
- Flash Stock Recovery
- Flash CWM Recovery (thanks to Chenglu)
- Rename Recovery Restore files if present
- Flash Insecure Boot Image for adb mode
- Flash Stock Boot Image back to your phone
- Create tar file to flash via Odin (from upto 10 image files) with 1-click process
- Download, Extract and Flash Stock Rom (full DETAILED steps) ESSENTIAL FOR WARRANTY RETURNS
- Rip cache.img to zip file in CWM format for editing and flashing (thanks to Adam Lange)
- Install a single apk or multiple apk's to your phone (being worked on)
- Push Files from your PC to your phone
- Pull Files from your phone to your PC
- Set Files Permissions on your phone
- Dump selected LogCat buffers to your PC
- Dump BugReport to your PC (if installed)
- Help, Information Screen for various tasks
- Mods Section to Modify your phone (being worked on)
- Reboot Phone options in adb mode
- Change background, text colour in ToolKit
- Activate Donator features from within the ToolKit
What you need to prepare:
1. INSTALLING GALAXY NOTE2 DRIVERS
The first thing you need to do is to install the drivers. These are needed so that you can communicate with the phone via the PC and perform the tasks that the ToolKit offers.
NOTE: If you have Kies installed then it is advisable to uninstall it first to avoid conflicts.
a. Make sure your phone is booted into Android and the USB cable is unplugged.
b. Select Option 1 in the ToolKit to install the Samsung USB Driver pack. This should install all the neccessary drivers you need.
C. While the drivers are installing make sure that USB Debugging is enabled on your phone via the Settings, Developer options Screen.
d. After the drivers have been installed connect the USB cable and the PC should detect the phone and install the correct drivers. This will also happen when you enter Download Mode and Recovery Mode for the first time.
e. If you want to check the drivers then go to your Control Panel on your PC and open the Device Manager. With the USB cable connected you should see a device listed as 'Samsung Android Phone' or something similar and a driver attached to it.
NOTE: If you are having trouble with your device being detected or the drivers installing correctly then you could try rebooting your phone, using a different usb port and making sure no other drivers are installed on your pc.
--------------------------------------------------------------
--------------------------------------------------------------
2. USING MSKIPS' SAMSUNG GALAXY NOTE2 TOOLKIT
a. Download the Samsung Galaxy Note2 ToolKit package and run to install the ToolKit to your PC. The installation will also create a Shortcut on your desktop for easy access. You have the option to include or exclude the drivers files at installation so if you already have your drivers set up and are just updating the ToolKit then you can untick the drivers if you wish.
b. Once the ToolKit is installed make sure your phone is booted and plugged in via USB cable and double click on the 'Galaxy Note2 ToolKit' shortcut on your desktop to run it.
c. You will be asked if you want to check for an Update. This will download and check the latest version numbers against the versions in the ToolKit. If there is an update available then you will have the option to download and install it (donator feature).
d. You will now be presented with a Model Selection Screen to choose the build that you are currently on. If you cannot find the build your phone is using then select the HELP option to get more info.
e. When you enter the Main Menu you will see 'Adb Mode' at the top. If you have installed your drivers correctly then you will see your phones serial number under the text with 'device' next to it. If you see this then your device is connected and you can carry on.
f. Each option in the ToolKit has full information on what it is and how to use it.
--------------------------------------------------------------
--------------------------------------------------------------
3. FLASHING A ROM, RADIO OR KERNEL VIA CWM RECOVERY
a. Download your chosen Rom, Radio or Kernel from the Development Forum, then make sure your phone is booted up as normal and connect your usb cable so it goes into MTP Mode. Copy the .zip file (DO NOT UNZIP IT FIRST) to the 'Internal Storage' part on your phone. Do not copy it to a Sub Directory as it will be harder to find when flashing it.
b. Enter CWM Recovery (shut down the phone then hold down the 'HOME' + 'VOLUME UP' buttons and press the 'POWER' button for about 5 seconds).
c. Select 'Install zip from sdcard' and select 'choose zip from sdcard' if the file is on Internal Memory.
d. Scroll to your zip file and select. Then select 'Yes' in the list to start flashing.
e. When flashing is finished press the BACK Button to go back until you get to the Main Menu and then select 'reboot system now' to reboot your phone into Android.
--------------------------------------------------------------
--------------------------------------------------------------
4. FLASHING A ROM, RADIO OR KERNEL VIA DOWNLOAD MODE USING ODIN
Odin can be used to flash image files or parts of your phone. You can flash something as simple as a boot image or a complete system. Everything is packed in a tar or tar.md5 file on your PC and flashed via Odin which is a Windows OS program.
a. Make sure you have your tar file stored on your PC.
b. Reboot your phone to Download Mode [shut down your phone, then hold down the Home + Volume DOWN Buttons and press the Power Button for about 2 seconds until a Warning screen appears. Press Volume UP to continue to Download Mode.
c. Connect your phone via usb and the first box at the top under ID:COM should turn blue and have some text in it. If you are using Download Mode on your phone for the first time then you will notice drivers being installed to use it.
d. The site or page you downloaded the file from will usually give you instructions to set Odin but if not you want to load boot/recovery/system files to the PDA location and have 'Auto Reboot' and 'F.Reset Time' ticked and nothing else.
e. Click on 'Start' to start the flash. You can see what is happening in the text box in the lower left.
--------------------------------------------------------------
--------------------------------------------------------------
USEFUL INFORMATION
How to get into Recovery Mode
1. Unplug the USB cable.
2. Shut down the phone.
3. Hold down the 'HOME' + 'VOLUME UP' buttons and press the 'POWER' button for about 5 seconds to enter Recovery Mode.
How to get into Download Mode (For Odin)
1. Unplug the USB cable.
2. Shut down the phone.
3. Hold down the 'HOME' + 'VOLUME DOWN' buttons and press the 'POWER' button for about 2 seconds until a WARNING! Screen appears. Press the 'VOLUME UP' button to enter Download Mode.