How to Unlocking Bootloader on Sony Ericsson X10 Mini Using SE Tweaker Tool (Tutorial)


Previously we have been posted the tutorial about how to unlocking bootloader on Sony Ericsson X8 here, and Sony Ericsson W8 here, now i will explain the tutorial about unlocking bootloader on Sony Ericsson X10 Mini. This tutorial also uses same methods as before in which using SE Tweaker Tool.

SE Tweaker Tool is a Tool + Guide to make some tweaks to ur phone With ease which includes of all the necessary utilities for many devices. Unlocking the bootloader of your phone will restore the original sim lock of your phone (if you had any) unless if you unlocked with EMMA/IMEI unlock code or it was factory-unlocked or if SE unlocked it! However, some users have reported that using msm7227_semc.cmd on their sim-unlocked phones did not restore the sim lock onto their phone.

Read this before doing Unlocking Bootloader

NOTE: Dealing with the bootloader is highly dangerous and can result in a hard brick if you don't follow the proper instructions. Then, you will have to go and repair your phone by sending it to SE. I am not responsible if your phone dies on you because you didn't follow instructions or you screwed up somehow. Unlock the bootloader on your sim unlocked phone AT YOUR OWN RISK!

Only For people getting error related iscoolbutton.ocx.. Just Run the ocx_fix.bat in the downloaded tool and then Run the SE Tweaker Tool..

Requirements: 
  • Rooted phone, Sony Ericsson PC Companion installed in PC, Courage
  • You do not need to have a sim lock on your phone to unlock your Bootloader.

Recommended:
  • Disable your Antivirus (it might find a "virus" in ADB.exe even though there isn't one and might even interfere in bootloader unlocking process) 
  • USB debugging enabled.

Download the files needed for the unlock.
  • Download Flashtool (needed for S1tool to work properly and for loading custom kernels next time) and install it (not necessary if you already have Flashtool):
  • Download and install Flashtool v0.5.3 here (follow instructions on the website).
  • After installing it, open the flashtool folder and open the drivers folder inside that. Double click on the ggsetup-2.2.0.11.exe file inside and install Gordon's Gate.
  • Then restart your computer. if you dont Find GORDAN'S gate.exe in the drivers folder download it from my attachments.

Steps To unlock Bootloader:
  • After installing Gordans Gate and the flashtool Turn off your phone.
  • Download SE Tweaker Tool also Mirror[Mediafire] and unzip it.
  • Run SE_Tweaker_Tool.exe from it.
  • NOTE: If no flashtool download from the dialog box appeared after running unlockbootloader.exe
  • Turn off ur phone
  • Select unlock_bootloader button.. run S1tool button to check if the your phone has SIM UNLOCK CERTIFICATE.[i.e click on "Do" in s1tool and compare the output]
  • Boot your phone into flash mode (make sure you installed Gordon's Gate and usb debugging is on). All users, press and hold back button while connecting cable from PC to phone. Continue holding back button until you get some output. The LED on your phone should flash green if it is in flash mode.
  • Click on how it should look.. it will give u an idea how the output will be..
  • NOTE- At this moment you should know if you have SIM UNLOCK CERTIFICATE or what ever the output was.. keep that in mind.. 
  • Now disconnect[/COLOR] your phone n boot it up.Connect it again to PC (make sure your USB DEBUGGING is enabled and antivirus is disabled) 
  • Now click the check box which is right for you [Read them carefully it will be according to the output you got with s1tool] run the corressponding button.. 
  • After it proceed to check if the unlocking of bootloader was done by clicking Check If your "Bootloader is unlocked And Proceed" button..
  • Reboot your phone to flashmode as before.. Run s1tool.. N compare the output.. 

If the line RUNNING S1_EROM FROM VER "#8A02$" has a lowercase "r" letter replacing the "#" (RUNNING S1_EROM FROM VER "r8A02$"), your bootloader has been unlocked . If it has an uppercase "R" replacing the "#" (RUNNING S1_EROM FROM VER "R8A02$"), your bootloader is NOT unlocked.


Re-locking the Bootloader Follow the steps in the Tool

DOWNLOAD THE KERNEL WHICH YOU WANT
[Note: If it is downloaded in *.zip or *.rar format just open with any zip tool like Winrar or 7zip tool n extract the *.ftf file to your drive n later put in into the /firmwares folder of flashtool and follow below steps to Flash]

How to flash custom kernels:
  • Put the *.ftf file in the /firmwares folder. ( flash only the .ftf file.)
  • Open Flashtool.
  • Click Flash.
  • Select (kernel name).ftf.
  • Turn off your phone.
  • Connect your phone in flash mode (only when the popup window prompts for you to do so). (To boot into flash mode, press and hold back button while connecting your phone to the PC using an usb cable).
  • Disconnect your phone (do so only when the popup window to prompts you to disconnect your phone).
  • Reboot and you have a custom kernel! 
  • Confirm by going to Settings --> About Phone --> Kernel version. It should have the name of the kernel you flashed.
To flash back to stock kernel, download the file here and follow steps listed above.

Advantages and Disadvantages of Rooting Android Devices


For those who buy Android devices, such as Samsung, Sony Xperia, HTC, LG, etc may may seems confuse to hear such a word of Rooting OS Android devices. I think it is oke the word may seems strange and need a little explanation. On this article i will explain a little about what is the meaning of Rooting, the advantage of it, and the disadvantage you should know before making decision of rooting the devices.

What rooting does: 
Rooting your phone does a number of things. It lets you get Superuser access to your root directory (where you can customize things like appearance or performance). It also allows you to flash(flash is rooting terms for install) a different kernel, optimized for the ROM of your choosing.

Advantages of Rooting Your Android:

Run Custom ROMs
ROMs are what I referred to earlier as the developers overtime. They create their own version of Android, a new Operating System, that customizes your smart phone experience. It can change the color of your icons, change the app dock, whether or not you have an app menu, etc. It can do basically anything. With a ROM you can uncap the full potential of your phone.

Installing Special Apps
There are a number of apps on the market that only work while rooted. Screenshot apps, overclocking apps, etc. Just by rooting you are able to do so much more in the Market.

Free Internal Storage
People who have low internal memory can transfer any application from internal memory to SD card after rooting their phone. There are some applications that provide the option by default. But if you want to force move an app by creating a symlink, you must use an app that only works on a rooted phone. So those were about the merits. Nothing’s perfect and there are certain caveats associated with rooting an Android device.

Speed and performance 
Kernels are the things that tell your processor what to do, and how to do it. By changing that, you can change your processor speed and voltages. Meaning you are able to do what you love to do, only faster.

Looks
If you have the latest and greatest Android smart phone, you can't deny wanting eye-candy. It's your desire, and the reason you enjoy Android so much. When you root, you can take any imperfections out. If you think it would look better with a blue theme instead of a green one, or you want your favorite color everywhere, you can do it. If you don't like the default layout of the phone, or the styling, you can change it too. You can even make it look like an iPhone. (Though I wouldn't know why you would.)

Customization
This ties into the looks and speed and performance sections. Being able to say that no one around has the same phone as you is nice (iPhone users reading this don't know what it's like). But the moment when you do see someone with your phone, and you can still say your phone is different, is priceless. It gives people warm fuzzies inside.

Disadvantages of Rooting Your Android

Your Phone Might Get Bricked
Not to demotivate you here, but when I tried to root my first Android phone – Samsung Galaxy S – I bricked it and it was in the service center for next 15 to 20 days. No matter how good a rooting tutorial is, it’s a daunting task and if you miss out any step or flash a corrupt zip file (that’s what happened to me) you might end up with a bricked (broken) phone.

Now assuming that you are not a power user, you will have to go to your phone manufacturer’s service center and get your phone fixed. Moreover, if they come to know that the brick or semi-brick has caused because you were trying to root your phone, you might as well be charged for it.

You End up Voiding Phone’s Warranty
As soon as you root your phone, you void your phone’s warranty and if anything happens to your phone even when it’s in the warranty period, the company is going to charge you for the repairs. In some of the phones, you can un-root your phone, but in most of the phones there’s is no going back.

How to Root Haipai Noble i9220 MTK6575 Android 4.0 Ice Cream Sandwich [Tutorial]

How to Root Haipai Noble i9220 MTK6575 Android 4.0 Ice Cream Sandwich [Tutorial]


Haipai Noble i9220 is another great chinese device which looks like Samsung Galaxy Note. I posted about the review of this phone last time here. But we have to remember all andorid devices should be rooted first before the owners can enjoy the full abilities using their phones. This rooting procedure also applied to this chinese great phone Haipai Noble i9220.

On this post i will explain about how to root Haipai Noble i9220 with Android 4.0 Ice Cream Sandwich step by step, so you can follow the intruction below carefully:

Note:
  • The instructions in this guide are intended for use with the Haipai Noble i9220 MTK6575. Applying these instructions on another device or model may produce undesired outcomes.
  • The information in this guide is provided for instructional and educational purposes only. There is no guarantee that these instructions will work under your specific and unique circumstances.
  • Use these instructions at your own risk. We shall not hold any responsibility or liability for whatever happens to you or your device arising from your use of the info in this guide.
  • Read and understand the whole guide first before actually performing the instructions.
  • This Procedure works for Mobiles having stock ROM only, and will definitely void your warranty, although the warranty can be claimed by un-rooting your device.

What you need to prepare:
  • Haipai Noble i9220 MTK6575 and a PC
  • Backup all personal data on your phone to make sure you have a copy of your personal data (e.g., contacts, SMS, MMS, Internet settings, Wi-Fi passwords, and the like) in case the procedure in this guide erases such data. Guide from here
  • Make sure your device has at least 75% of phone battery charge.
  • Download this file here. (which is including: vold.fstab, Mtk6575 USB Driver, latest flashing tool and the firmware as well as a root file FOR HAIPAI I9220 ONLY)

Steps to root Haipai Noble i9220 MTK6575:
  • Please download root file from the link above.
  • Go to settings-developer options-click USB debugging.
  • Connect the phone with computer,turn on usb device.
  • Click the file you download from the link TPSparkyRoot.bat
  • Your phone will restart first time,after the phone start finish(until you see the unlock),click enter in the window of TPSparkyRoot.bat.
  • The phone will restart second time,still the same as first time we did.Then start third time,same as we did in last two times.Click enter then phone was rooted.
  • You will see two more app was installed in your phone that means root phone successfully.

After successfully rooted, it will install root explorer.apk Chinese version which is rather useless for installing Market because it's all in Chinese. Thus, you need to download this "ES File Explorer" in order to put Google Play into the system folder. People who have a problem when installing Google Play by using apk, for example: Error processing purchase [DF-BPA-13]


Here is how to install a new and working Google Play Store:
  • Download "Vending.apk" from the same 4shared folder above. 
  • Copy Vending.apk to \system\app\ folder in your phone by using ES File Explorer in root explorer mode with system file mounted.
  • Change permission of Vending.apk to Read/Write for Owner; Read for others (rw-r--r--)
  • Shutdown your phone.
  • Switch on your phone, you will see Google Play Store app, and Enjoy !

Haipai I9220 Noble Reviews: A Samsung Galaxy Note Clone Only $172.99

Haipai I9220 Noble (4 Stars out of 5)


Well, maybe it’s not simply about a tight budget any longer, to my understanding, most of those new brand smartphones are more or less politically over-prized. Yes, you are definitely right in saying that Chinese phones are not all junk, especially today – since they have been improved quite a lot during the last couple of years. Unless there is a strong need, why spending a fortune on something which is more or less outdated a year later on?

Specification:


CPU  MT6575 1Ghz CPU + 800 MHz GPU
OS Android 4.0 Ice Cream Sandwich
Language: English, Arabic, French, German, Indonesian, Italian, Malay, Portuguese, Russian, Spanish, Thai, Turkish, Vietnamese, Traditional Chinese, Simplified Chinese, others
Memory RAM : 512MB / ROM : 4GB
MAX support 64GB Class 12 Micro SD Memory Card (TF-Card)
Size 147 × 86 × 9.7 mm
Weight 165 g
Screen 5.2-inch Capacitive multi-touch screen (5 points), WVGA PX: 480 x 800, 16 Million Colors
Network Dual SIM Dual Standby, supports W+G or G+G
2G:GSM/EDGE/GPRS 850/900/1800/1900MHz
3G:WCDMA/HSPDA 850/2100MHz
Supports GSM service all over the world
Color Black
GPS Built In GPS, supports voice navigation
Connection Bluetooth with EDR & A2DP
Wi-Fi : IEEE 802.11 b/g/a, WiFi Hotspot functionality, Tethering & portable hotspot
Micro USB 2.0
Camera Dual Camera
Back 5.0 Mega Pixel with Auto focus and Flash LED
Front 0.3 Mega pixel
Video playback and recording, supported formats: 3GPP, MP4, 720P(1280 x 720)
Sensor Gravity Sensor, Proximity Sensor, Light Sensor
Radio FM
Video AVI , MP4 , FLV , 3GP , MOV , ASF , MPEG , RMVB , etc.
Audio MP3 , AAC , WAV , etc. / 3.5 mm Audio Jack
Special functions Gravity Sensor, Proximity Sensor, Light Sensor, FM Radio, Wifi, GPS, Multi-touch Capacitive Screen, Dual SIM, Schedule Power On/Off, Handwriting
Battery and Accessories - Li-ion Batteries 2800 mAh
- Earphone / 3.5 mm Audio Jack
- USB Cable


Photo:


Display:
A positive experience – or, just right:

1. The actual density means objects are not as small as on screens with a very high density, the number of dots per inch (DPI), well, even this numer of pixels is displayed on a 5.2″ screen, there is no low density ‘pixel-effect’ which I feared having to live with (e.g. emails on my old HTC Wildfire v1 are hard to read because of the low density of the Wildfire display). On my LG E900 emails along with other objects were hard to read because objects were simply too small due to the same number of pixels on a 3.8″ screen, the density was too high.

2. Brightness is good, adjustable in three levels, or automatically controlled by the system.

3. Viewing angle may not be as perfect like the original Samsung Galaxy Note but it is very good from horizontal angles from side to side, if the device is held in normal vertical position and several people are looking at the screen; the vertical viewing angle is mainly good between center and low, it weakens when looking from top, but this is an unnatural viewing position anyway.
4. The number of colors is not an issue here (some [older] Chinese smartphones are reported to provide a poor display experience in this respect).

Performance:
One word – GREAT! For any task the best experience so far. Playing games is not my cup of tea, please watch YouTube videos for a demo of game performance on that single core CPU/GPU couple. When everything is so fast, then the start of the camera App seems a bit slow, but still Ok with around 3.5 seconds.

Power consumption:
Very good in comparison, the battery lasts almost two days including polling three email accounts, one calendar, several phone calls, some browsing. Sure, when driving for hours and additionally providing tethering for my HTC which I use for navigation plus data (GPS see below), then I have to recharge in the same night.

Memory:
To my surprise it came with a fixed built in SD card of 2GB size. There is, however, a slot available for inserting an extra micro SD card. About the size, I am using a 16GB card class 6 but I read about people using a 64GB card. The interesting thing is, that when connecting to a computer, both SD cards are presented separately, a reasonable usage might be i.e. the 2GB rather for internal use, the additional one for large media like music and photo collections.

Dual SIM:
Works as expected, this is a required feature in China due to the sheer size of the country and the resulting gaps of network coverage. Only one SIM card can be assigned as the 3G data carrier (high speed data), but this can be switched thru settings though, no need to open the phone and swap the SIM cards physically. Sending of text messages can be assigned to one or the other SIM card, the setting is kept as the default. Making phone calls, I keep the setting to choose the SIM every time I want to make a call, however, a default SIM can be defined, without asking every time. The network name (and the color) associated with a SIM card can be edited. In the list of recent phone calls and practically everywhere the used SIM network is displayed, you always know which SIM was or is used for which phone call or test message. Unless there is a phone call currently going on, the phone is ALWAYS listening standby on both SIM networks for incoming calls and text messages. (using both SIM cards for actually making phone calls at the same time is not possible, technically it would be, but to my knowledge only with very high power consumption)

Cam:
The picture quality of the 8GB camera is Ok and the Cam is offering many nice settings, however, do not expect the same resolution like an original Samsung Galaxy smartphone, which is another price tag. In reviews about other China smartphones I read about setting the 8GB Cam to it’s native 5GB resolution would improve the quality. This doesn’t seem to be the case here. The 8GB setting is still giving the best results, well, just my results of a few minutes trying a few settings.

GPS:
So far, all comments I read on smartphones coming from Chinese producers are rather negative on the GPS capability, this device is no exception.

GPS Apps I’m using:
‘GPS Status’ by EclipSim turned out to be very helpful on Android phones, I run it to get a fix before I’m using e.g. Endomondo; RunKeeper works very bad on the Haipai, whereas Endomondo works quite well, so GPS quality even depends on the used application.

Walking:
GPS basically works, it takes just around a half minute for the fix, then works halfway as good (subjective impression) as other (brand) smartphones I have been using (LG Win7 E900, iPhone 3GS) and still use (HTC Wildfire v1). So, while my HTC does a quite accurate tracking of within 10 meters, the GPS tracking on the Haipai does the job as well but jumps around from time to time. When looking at the track later on, it seems like not being accurate within the range of 10 to 50 meters, only roughly useful.

Driving:
When using the Google Navigation App, it’s possible to navigate and the big screen makes it a pleasure to look at, but due to occasional jumps and off-road tracking it can be a challenge to deal with.

GPS data fix:
The Haipai GPS settings are offering a download of ‘EPO assistance data’, the download worked, no idea how to test, and no time, sorry.

My personal GPS solution:
Since all the networking including tethering works like a breeze on the Haipai I’m setting the Haipai to ‘tethering’ along with ‘keeping this mode’, then I connect my HTC Wildfire thru WiFi and use that for navigating and tracking, for walking and driving. The additional advantage of that solution is to still have the Haipai free for any other tasks, including using it’s own GPS with a map, making phone calls, etc., just WiFi is not working of course, since this feature is used the other way around: the Haipai is set as a WiFi hotspot during that time.

Size, handling and weight:
The weight and the shape of the device feels good and balanced. For an average size of hands, single hand operation is possible, i.e. moving an icon, starting an application, opening a mail. It fits a shirt pocket with the flip cover mounted, but barely any space left, for that 5.2″ screen device I wasn’t sure about that. Since it comes with a normal back cover and with a flip cover, one can choose among them. I’m using the flip cover which I feel is more protective during a working day.

Screen protector and sensitivity:
I placed the included screen protector which improves the touch experience, I did that after trying to touch and swipe without the screen protector which felt slightly sticky, especially swiping works much better with the screen protector. Some cleaning spray and good light conditions are important before placing the screen protector. With the power supply connected, the display sometimes can ‘feel’ a bit oversensitive and another app gets selected than the one you are touching, this is a known effect also from other smartphones, and it also may depend a bit on how the device is hold in the hand.

Sound quality:
Both the speech quality and the sound quality of polyphonic ring tones are rather good, on a scale of 0 to 100 where #100 is the best and clear sound I would give a #65. (iPhone 3GS=#30, LG E900=#20, HTC Wildfire v1=#90). One thing: the included head set is of a cheap, humble sound quality which can turn listening to music into kind of a torture after a while. Unfortunately the 3.5mm plug is slightly deeper/longer than usual Western head phone plugs, no time for a solution yet. It may be possible to order a high quality head set thru a Chinese shop …? just an idea. At least, it’s a head set, not just a head phone, so it’s fine for just making – and taking – phone calls in a hands-free fashion.

Important App for Android:
Over the time and when using diverse applications, the working memory of an Android phone is becoming smaller, this can make the device slower or even prevent a certain task which requires more memory than available. Thus it makes sense to use a task manager (like e.g. ‘ES Task Manager’) which is a way to kill all tasks in the background to free memory. In case of the Haipai I initially have a bit over 200 MB free, after using a lot of things it’s getting down to around 80 MB. So, from time to time, or before I’m going to the Google PlayStore to – maybe – install something new, I’m going to kill all tasks first to avoid possible problems caused by ‘not enough memory’.

Conclusion:
Considering the price tag and the overall quality along with the features, one might estimate it’s 75% of the features of a Samsung Galaxy Note while it’s 40% of the price. I personally would buy it again, immediately.

How to Unlocking Bootloader on Sony Xperia W8 Using SE Tweaker Tool (Tutorial)


How to Unlocking Bootloader on Sony Xperia W8 Using SE Tweaker Tool (Tutorial)

After i posted the way to unlocking the bootloader of the Sony Xperia X8 on this post, this time i will explain about how to Unloackig Bootloader of the Sony Xperia W8. The tutorial is a little bit same of the previous tutorial.

SE Tweaker Tool is a Tool + Guide to make some tweaks to ur phone With ease which includes of all the necessary utilities for many devices. Unlocking the bootloader of your phone will restore the original sim lock of your phone (if you had any) unless if you unlocked with EMMA/IMEI unlock code or it was factory-unlocked or if SE unlocked it! However, some users have reported that using msm7227_semc.cmd on their sim-unlocked phones did not restore the sim lock onto their phone.

Read this before doing Unlocking Bootloader

NOTE: Dealing with the bootloader is highly dangerous and can result in a hard brick if you don't follow the proper instructions. Then, you will have to go and repair your phone by sending it to SE. I am not responsible if your phone dies on you because you didn't follow instructions or you screwed up somehow. Unlock the bootloader on your sim unlocked phone AT YOUR OWN RISK!

Only For people getting error related iscoolbutton.ocx.. Just Run the ocx_fix.bat in the downloaded tool and then Run the SE Tweaker Tool..

Requirements: 
  • Rooted phone, Sony Ericsson PC Companion installed in PC, Courage
  • You do not need to have a sim lock on your phone to unlock your Bootloader.

Recommended:
  • Disable your Antivirus (it might find a "virus" in ADB.exe even though there isn't one and might even interfere in bootloader unlocking process) 
  • USB debugging enabled.

Download the files needed for the unlock.
  • Download Flashtool (needed for S1tool to work properly and for loading custom kernels next time) and install it (not necessary if you already have Flashtool):
  • Download and install Flashtool v0.5.3 here (follow instructions on the website).
  • After installing it, open the flashtool folder and open the drivers folder inside that. Double click on the ggsetup-2.2.0.11.exe file inside and install Gordon's Gate.
  • Then restart your computer. if you dont Find GORDAN'S gate.exe in the drivers folder download it from my attachments.

Steps To unlock Bootloader:
  • After installing Gordans Gate and the flashtool Turn off your phone.
  • Download SE Tweaker Tool also Mirror[Mediafire] and unzip it.
  • Run SE_Tweaker_Tool.exe from it.
  • NOTE: If no flashtool download from the dialog box appeared after running unlockbootloader.exe
  • Turn off ur phone
  • Select unlock_bootloader button.. run S1tool button to check if the your phone has SIM UNLOCK CERTIFICATE.[i.e click on "Do" in s1tool and compare the output]
  • Boot your phone into flash mode (make sure you installed Gordon's Gate and usb debugging is on). All users, press and hold back button while connecting cable from PC to phone. Continue holding back button until you get some output. The LED on your phone should flash green if it is in flash mode.
  • Click on how it should look.. it will give u an idea how the output will be..
  • NOTE- At this moment you should know if you have SIM UNLOCK CERTIFICATE or what ever the output was.. keep that in mind.. 
  • Now disconnect[/COLOR] your phone n boot it up.Connect it again to PC (make sure your USB DEBUGGING is enabled and antivirus is disabled) 
  • Now click the check box which is right for you [Read them carefully it will be according to the output you got with s1tool] run the corressponding button.. 
  • After it proceed to check if the unlocking of bootloader was done by clicking Check If your "Bootloader is unlocked And Proceed" button..
  • Reboot your phone to flashmode as before.. Run s1tool.. N compare the output.. 

If the line RUNNING S1_EROM FROM VER "#8A02$" has a lowercase "r" letter replacing the "#" (RUNNING S1_EROM FROM VER "r8A02$"), your bootloader has been unlocked . If it has an uppercase "R" replacing the "#" (RUNNING S1_EROM FROM VER "R8A02$"), your bootloader is NOT unlocked.


Re-locking the Bootloader Follow the steps in the Tool

DOWNLOAD THE KERNEL WHICH YOU WANT
[Note: If it is downloaded in *.zip or *.rar format just open with any zip tool like Winrar or 7zip tool n extract the *.ftf file to your drive n later put in into the /firmwares folder of flashtool and follow below steps to Flash]

How to flash custom kernels:
  • Put the *.ftf file in the /firmwares folder. ( flash only the .ftf file.)
  • Open Flashtool.
  • Click Flash.
  • Select (kernel name).ftf.
  • Turn off your phone.
  • Connect your phone in flash mode (only when the popup window prompts for you to do so). (To boot into flash mode, press and hold back button while connecting your phone to the PC using an usb cable).
  • Disconnect your phone (do so only when the popup window to prompts you to disconnect your phone).
  • Reboot and you have a custom kernel! 
  • Confirm by going to Settings --> About Phone --> Kernel version. It should have the name of the kernel you flashed.
To flash back to stock kernel, download the file here and follow steps listed above.


How to Root and Backup Samsung Galaxy Note 2 Using Toolkit (More Option with Easy)


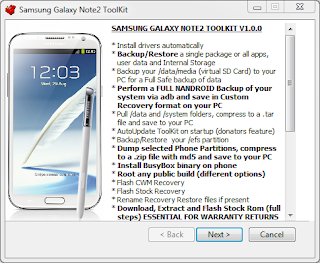
On this article i will explain how to root, backup, flash the latest stock image, install drivers, and more option to the Samsung Galaxy Note 2 using a toolkit. All you need to do is just download this free version of toolkit which includes everything you could do possibly to maniputale your Samsung Galaxy Note 2. Thanks to xda-forum members who always develop the Android Operating System to be more handly and amazing.


What you need to know about the functions of this toolkit is below:
  • Install drivers automatically
  • Backup/Restore a single package or all apps, user data and Internal Storage
  • Backup your /data/media (virtual SD Card) to your PC for a Full Safe backup of data
  • Perform a FULL NANDROID Backup of your system via adb and save in Custom Recovery format on your PC
  • Pull /data and /system folders, compress to a .tar file and save to your PC
  • Auto Update ToolKit to latest push version on startup (donator feature)
  • Backup/Restore your /efs partition
  • Dump selected Phone Partitions, compress to a .zip file with md5 and save to your PC
  • Install BusyBox binary on phone
  • Root any public build (different options available)
  • [B]Root with Superuser (ChainsDD) or SuperSU (Chainfire) via CWM (works on ANY build)
  • Flash Stock Recovery
  • Flash CWM Recovery (thanks to Chenglu)
  • Rename Recovery Restore files if present
  • Flash Insecure Boot Image for adb mode
  • Flash Stock Boot Image back to your phone
  • Create tar file to flash via Odin (from upto 10 image files) with 1-click process
  • Download, Extract and Flash Stock Rom (full DETAILED steps) ESSENTIAL FOR WARRANTY RETURNS
  • Rip cache.img to zip file in CWM format for editing and flashing (thanks to Adam Lange)
  • Install a single apk or multiple apk's to your phone (being worked on)
  • Push Files from your PC to your phone
  • Pull Files from your phone to your PC
  • Set Files Permissions on your phone
  • Dump selected LogCat buffers to your PC
  • Dump BugReport to your PC (if installed)
  • Help, Information Screen for various tasks
  • Mods Section to Modify your phone (being worked on)
  • Reboot Phone options in adb mode
  • Change background, text colour in ToolKit
  • Activate Donator features from within the ToolKit


What you need to prepare:

1. INSTALLING GALAXY NOTE2 DRIVERS

The first thing you need to do is to install the drivers. These are needed so that you can communicate with the phone via the PC and perform the tasks that the ToolKit offers.

NOTE: If you have Kies installed then it is advisable to uninstall it first to avoid conflicts.

a. Make sure your phone is booted into Android and the USB cable is unplugged.

b. Select Option 1 in the ToolKit to install the Samsung USB Driver pack. This should install all the neccessary drivers you need.

C. While the drivers are installing make sure that USB Debugging is enabled on your phone via the Settings, Developer options Screen.

d. After the drivers have been installed connect the USB cable and the PC should detect the phone and install the correct drivers. This will also happen when you enter Download Mode and Recovery Mode for the first time.

e. If you want to check the drivers then go to your Control Panel on your PC and open the Device Manager. With the USB cable connected you should see a device listed as 'Samsung Android Phone' or something similar and a driver attached to it.

NOTE: If you are having trouble with your device being detected or the drivers installing correctly then you could try rebooting your phone, using a different usb port and making sure no other drivers are installed on your pc.

--------------------------------------------------------------
--------------------------------------------------------------

2. USING MSKIPS' SAMSUNG GALAXY NOTE2 TOOLKIT

a. Download the Samsung Galaxy Note2 ToolKit package and run to install the ToolKit to your PC. The installation will also create a Shortcut on your desktop for easy access. You have the option to include or exclude the drivers files at installation so if you already have your drivers set up and are just updating the ToolKit then you can untick the drivers if you wish.

b. Once the ToolKit is installed make sure your phone is booted and plugged in via USB cable and double click on the 'Galaxy Note2 ToolKit' shortcut on your desktop to run it.

c. You will be asked if you want to check for an Update. This will download and check the latest version numbers against the versions in the ToolKit. If there is an update available then you will have the option to download and install it (donator feature).

d. You will now be presented with a Model Selection Screen to choose the build that you are currently on. If you cannot find the build your phone is using then select the HELP option to get more info.

e. When you enter the Main Menu you will see 'Adb Mode' at the top. If you have installed your drivers correctly then you will see your phones serial number under the text with 'device' next to it. If you see this then your device is connected and you can carry on.

f. Each option in the ToolKit has full information on what it is and how to use it.

--------------------------------------------------------------
--------------------------------------------------------------

3. FLASHING A ROM, RADIO OR KERNEL VIA CWM RECOVERY

a. Download your chosen Rom, Radio or Kernel from the Development Forum, then make sure your phone is booted up as normal and connect your usb cable so it goes into MTP Mode. Copy the .zip file (DO NOT UNZIP IT FIRST) to the 'Internal Storage' part on your phone. Do not copy it to a Sub Directory as it will be harder to find when flashing it.

b. Enter CWM Recovery (shut down the phone then hold down the 'HOME' + 'VOLUME UP' buttons and press the 'POWER' button for about 5 seconds).

c. Select 'Install zip from sdcard' and select 'choose zip from sdcard' if the file is on Internal Memory.

d. Scroll to your zip file and select. Then select 'Yes' in the list to start flashing.

e. When flashing is finished press the BACK Button to go back until you get to the Main Menu and then select 'reboot system now' to reboot your phone into Android.

--------------------------------------------------------------
--------------------------------------------------------------

4. FLASHING A ROM, RADIO OR KERNEL VIA DOWNLOAD MODE USING ODIN

Odin can be used to flash image files or parts of your phone. You can flash something as simple as a boot image or a complete system. Everything is packed in a tar or tar.md5 file on your PC and flashed via Odin which is a Windows OS program.

a. Make sure you have your tar file stored on your PC.

b. Reboot your phone to Download Mode [shut down your phone, then hold down the Home + Volume DOWN Buttons and press the Power Button for about 2 seconds until a Warning screen appears. Press Volume UP to continue to Download Mode.

c. Connect your phone via usb and the first box at the top under ID:COM should turn blue and have some text in it. If you are using Download Mode on your phone for the first time then you will notice drivers being installed to use it.

d. The site or page you downloaded the file from will usually give you instructions to set Odin but if not you want to load boot/recovery/system files to the PDA location and have 'Auto Reboot' and 'F.Reset Time' ticked and nothing else.

e. Click on 'Start' to start the flash. You can see what is happening in the text box in the lower left.

--------------------------------------------------------------
--------------------------------------------------------------

USEFUL INFORMATION

How to get into Recovery Mode
1. Unplug the USB cable.
2. Shut down the phone.
3. Hold down the 'HOME' + 'VOLUME UP' buttons and press the 'POWER' button for about 5 seconds to enter Recovery Mode.

How to get into Download Mode (For Odin)
1. Unplug the USB cable.
2. Shut down the phone.
3. Hold down the 'HOME' + 'VOLUME DOWN' buttons and press the 'POWER' button for about 2 seconds until a WARNING! Screen appears. Press the 'VOLUME UP' button to enter Download Mode.

How to Flash Samsung Galaxy Note 2 Jelly Bean Using Android Revolution HD [ROM]


Download Android Revolution HD 3.0 [ROM] for Samsung Galaxy Note 2 with Android 4.1.1. Thanks to XDA-forum members who are always making progress on developing such a great development for the Android users. On this article i will explain a little new ROM for the Samsung Galaxy Note 2, as the latest and the successor of Note 1.

As we already know that Samsung Galaxy Note 2 is released with the latest Android OS 4.1.1 Jelly Bean coming with great features and performances. There are already few devices that prepared to taste this Jelly Bean. Furthermore, for those who want to get more great performances can use this ROM which is already available for downlod on the link below.

Android Revolution HD 3.0 for Samsung Galaxy Note 2 is very fast than the original os, it is look stable and many more advantages you can get from this ROM once installed on your Note 2. These are some comments from the users who already tried the ROM on their Note 2:

Users experience with Android Revolution HD

"My phone is now perfectly smooth, fast, stable. I do not expect much more from my phone!"
DarkAdrien

"This release is amazing! ROM feels super fast! Great job Mike & the team! (...) Never noticed any lag. 1 word: brilliant."
Selec1

"Feels a lot smoother in use - scrolling, swiping between sense screens. Much nicer feel. This is a real good one, Mike. Many thanks "
dsm52

About the ROM

System details:
  • Android 4.1.1 (Jelly Bean) - latest official Samsung N7100XXALJ3 firmware
  • This is improved version of stock ROM - no visual changes!
  • Very fast, clean & stable!
  • Multi-language (WWE)
  • Full Arabic and Hebrew languages support! (ICS feature)
  • For Samsung Galaxy Note 2
  • Thanks to Samsung for the base firmware


Included kernel details:
  • Stock kernel (the most stable)
  • Possibility to choose Perseus custom kernel in AROMA installer


ROM details:
  • Removed software (CPU) rendering - full Exynos 4 Quad (GPU) rendering
  • Fully optimized and tweaked
  • ROOT (su + SuperSu Permissions - Thanks to chainfire)
  • Unsecured boot.img
  • Newest BusyBox
  • RAM optimizations
  • System signatures check enabled for system security and safety
  • Improved virtual memory management
  • Speed optimizations
  • Enabled GPU UI rendering
  • Data, cache and system partitions mounting tweaks
  • Bloatware applications removed
  • All /system applications updated to latest available
  • All /data applications updated to latest available
  • Improved camera performance
  • Improved CPU governors performance
  • Most optimal system scheduler
  • Disabled kernel debugging for better performance
  • Zipaligned (Improved RAM management)
  • Zipalign on boot (for user applications on data partition)
  • Fully de-odexed
  • init.d scripts (BusyBox run-parts) support
  • Auto init.d permissions set on boot
  • sysro/sysrw commands support
  • Excellent battery life!
  • Improved EXT4 performance
  • You can replace Samsung boot animation with any custom one (or use ICS default)
  • OpenVPN support
  • Most up-to-date system files permissions
  • Adobe Flash Player support for Jelly Bean
  • Support almost 24h a day
  • ...and many more!


You need:
  • Samsung Galaxy Note 2
  • Custom Recovery


How to flash:
  • Download ROM and place it on your virtual SD card
  • Download "Super Wipe" script & place it on your SD card (optionally if coming from earlier version of my ROM, obligatory if coming from stock or other custom ROM)
  • Boot your phone in recovery mode (vol up + home + power)
  • In main menu, select "install zip from sdcard"
  • Select "choose zip from sdcard" and browse to the location of "Super Wipe" script
  • Once again select "choose zip from sdcard" and browse to the location of Android Revolution ROM
  • After flashing process is complete, reboot the device


Changelog
Android Revolution HD 3.0
--- release date: 23 October 2012 ---

  • Updated modem
  • Multi csc - LJ3 set to EUR (Thanks to ::indie::!)
  • Other minor changes and fixes

- Super Wipe or Wipe inside AROMA (saves your internal SD-card) is highly recommended due to new base!

(Remember to check MD5 Checksum before flashing)
Android Revolution HD 3.0
--- MD5 Checksum: 2221BA4474B77E5DDC19676DA3BFC7CD ---


--- This script will erase and format your data (including Internal SD Card), system and cache partition ---
--- Your External SD Card will remain untouched FAT32 and it's recommended to leave it like that ---
--- Your Internal SD Card (/data/media) will be wiped ---
--- You need to copy ROM .zip file to your External SD Card before using Super Wipe ---

Hard Brick warning - Read Before Bootloader unlock


This post is intended to point your attention to the simple fact that there's a hardware imposed danger to hard brick your Xperia X8 and W8, applies to E15i/a and E16i/a, at the attempt to unlock the boot loader!

The phones affected by the problem are units being manufactured at, and after, 11W29!

To check if your device is affected by the problem follow this simple steps:
  • Turn off the phone and open it up
  • Take out the battery
  • Look at the sticker below
If the date code on the sticker reads 11W29, or any later date (11W30, 11W31, 11W32, 11W33, ...), DO NOT attempt to unlock the boot loader.

These phones ship with a revamped chipset configuration having the security hole the boot loader unlock uses effectively closed. This means that upon unlocking the boot loader your phone will end up as a hard brick - and you will have NO means to revive the phone yourselves. You either have to send it off to Sony Ericsson for repair (recommended solution) or find a phone repair shop being able to resurrect shot devices!

The symptom you will experience when unlocking the boot loader on an affected device is like this:
The boot loader unlock will most likely go through fine
At restart the phone will show NO signs of life anymore.
NO LED, NO LCD output, NO vibration.

This is the point where you can not do anything anymore yourself to resurrect the device.

You have been warned, DO NOT TRY to unlock the boot loader on phones manufactured PAST 11W29!

How to Unlocking Bootloader on Sony Xperia X8 Using SE Tweaker Tool (Tutorial)


SE Tweaker Tool is a Tool + Guide to make some tweaks to ur phone With ease which includes of all the necessary utilities for many devices. Unlocking the bootloader of your phone will restore the original sim lock of your phone (if you had any) unless if you unlocked with EMMA/IMEI unlock code or it was factory-unlocked or if SE unlocked it! However, some users have reported that using msm7227_semc.cmd on their sim-unlocked phones did not restore the sim lock onto their phone.

Read this before doing Unlocking Bootloader

NOTE: Dealing with the bootloader is highly dangerous and can result in a hard brick if you don't follow the proper instructions. Then, you will have to go and repair your phone by sending it to SE. I am not responsible if your phone dies on you because you didn't follow instructions or you screwed up somehow. Unlock the bootloader on your sim unlocked phone AT YOUR OWN RISK!

Only For people getting error related iscoolbutton.ocx.. Just Run the ocx_fix.bat in the downloaded tool and then Run the SE Tweaker Tool..

Requirements: 
  • Rooted phone, Sony Ericsson PC Companion installed in PC, Courage
  • You do not need to have a sim lock on your phone to unlock your Bootloader.

Recommended:
  • Disable your Antivirus (it might find a "virus" in ADB.exe even though there isn't one and might even interfere in bootloader unlocking process) 
  • USB debugging enabled.

Download the files needed for the unlock.
  • Download Flashtool (needed for S1tool to work properly and for loading custom kernels next time) and install it (not necessary if you already have Flashtool):
  • Download and install Flashtool v0.5.3 here (follow instructions on the website).
  • After installing it, open the flashtool folder and open the drivers folder inside that. Double click on the ggsetup-2.2.0.11.exe file inside and install Gordon's Gate.
  • Then restart your computer. if you dont Find GORDAN'S gate.exe in the drivers folder download it from my attachments.

Steps To unlock Bootloader:
  • After installing Gordans Gate and the flashtool Turn off your phone.
  • Download SE Tweaker Tool also Mirror[Mediafire] and unzip it.
  • Run SE_Tweaker_Tool.exe from it.
  • NOTE: If no flashtool download from the dialog box appeared after running unlockbootloader.exe
  • Turn off ur phone
  • Select unlock_bootloader button.. run S1tool button to check if the your phone has SIM UNLOCK CERTIFICATE.[i.e click on "Do" in s1tool and compare the output]
  • Boot your phone into flash mode (make sure you installed Gordon's Gate and usb debugging is on). All users, press and hold back button while connecting cable from PC to phone. Continue holding back button until you get some output. The LED on your phone should flash green if it is in flash mode.
  • Click on how it should look.. it will give u an idea how the output will be..
  • NOTE- At this moment you should know if you have SIM UNLOCK CERTIFICATE or what ever the output was.. keep that in mind.. 
  • Now disconnect[/COLOR] your phone n boot it up.Connect it again to PC (make sure your USB DEBUGGING is enabled and antivirus is disabled) 
  • Now click the check box which is right for you [Read them carefully it will be according to the output you got with s1tool] run the corressponding button.. 
  • After it proceed to check if the unlocking of bootloader was done by clicking Check If your "Bootloader is unlocked And Proceed" button..
  • Reboot your phone to flashmode as before.. Run s1tool.. N compare the output.. 

If the line RUNNING S1_EROM FROM VER "#8A02$" has a lowercase "r" letter replacing the "#" (RUNNING S1_EROM FROM VER "r8A02$"), your bootloader has been unlocked . If it has an uppercase "R" replacing the "#" (RUNNING S1_EROM FROM VER "R8A02$"), your bootloader is NOT unlocked.


Re-locking the Bootloader Follow the steps in the Tool

DOWNLOAD THE KERNEL WHICH YOU WANT
[Note: If it is downloaded in *.zip or *.rar format just open with any zip tool like Winrar or 7zip tool n extract the *.ftf file to your drive n later put in into the /firmwares folder of flashtool and follow below steps to Flash]

How to flash custom kernels:
  • Put the *.ftf file in the /firmwares folder. ( flash only the .ftf file.)
  • Open Flashtool.
  • Click Flash.
  • Select (kernel name).ftf.
  • Turn off your phone.
  • Connect your phone in flash mode (only when the popup window prompts for you to do so). (To boot into flash mode, press and hold back button while connecting your phone to the PC using an usb cable).
  • Disconnect your phone (do so only when the popup window to prompts you to disconnect your phone).
  • Reboot and you have a custom kernel! 
  • Confirm by going to Settings --> About Phone --> Kernel version. It should have the name of the kernel you flashed.
To flash back to stock kernel, download the file here and follow steps listed above.


How to Update Sony Ericsson Xperia X8 into Android 4.04 (Ice Cream Sandwich)


Hello guys, do you want to taste having Ice Cream Sandwich on your Xperia X8. If you do, then i will explain the tutorial How to Update Sony Ericsson Xperia X8 into Android 4.04 (Ice Cream Sandwich). You should know that this tutorial will use MiniCM9 which is an unofficial port of CyanogenMod 9 for the SEMC msm7x27 devices. MiniCM9 is running Android ICS on top of the nAa-ics kernel.

Features:
  • Built for MDPI
  • Full hardware acceleration (the ICS way)
  • Camera
  • Opengl rendering
  • MiniCM Update notifications via c2dm (Settings -> System -> Update notifications)
  • App2sd / Dalvik2sd compatible with 2.1 app2sd (storing to ext2/3/4 pre-existing partition is detected and mounted as such)
  • Android's native App2sd (move to sdcard, storing to fat)
  • In kernel ClockworkMod recovery v5.0.2.3 and option to reboot into Recovery
  • Modular Undervolting handled Settings -> Performance menu (by default not active)
  • KSM support
  • Extra Settings display option for Ultra brightness, also handled via notification bar icons
  • Smooth 2D scrolling in menus
  • Native Wifi Hotspot
  • Native USB tethering
  • Native Bluetooth tethering

Not Working:
  • HW Video encoding / decoding

Note:
  • The instructions in this guide are intended for use with the Sony Xperia X8. Applying these instructions on another device or model may produce undesired outcomes.
  • The information in this guide is provided for instructional and educational purposes only. There is no guarantee that these instructions will work under your specific and unique circumstances.
  • Use these instructions at your own risk. We shall not hold any responsibility or liability for whatever happens to you or your device arising from your use of the info in this guide.
  • Read and understand the whole guide first before actually performing the instructions.

This installation requires you to have:

Before installation of Android 4.04 on you X8, it is better to back up your phone to keep your files and data setting on your phone save. Make sure you have rooted your X8 and xRecovery is installed on your phone. The back up process we use now is using the tutorial below using xRecovery from the files above. For the tutorial to back up your X8, follow the link below:
How to Backup Your OS Android Phones Using xRecovery
Make sure that your battery has a charge of at least 80% to prevent your device from shutting down in the middle of the update process.After you backup your files from your phone, follow these steps below:

Instructions:
  • Download the MiniCM9-3.0.4.zip from the release link 
  • Backup your /data contents: contacts, apps, sms, etc. or backup via x-recovery above
  • Move the MiniCM9-3.0.4.zip  to the root folder of your sdcard. Download the suggested Google Apps for CM9 from here (check http://goo-inside.me/gapps/ if you want to experiment with other gapps versions)
  • Make sure you are using the nAa-ics kernel
  • Enter CWM and:
  • - Select 'backup and restore -> Backup'
  • - Select 'wipe data/factory reset' (MUST DO)
  • - Flash the MiniCM9-3.0.4.zip  To do this, Select 'install zip from sdcard -> choose zip from sdcard' and select the MiniCM9-3.0.4.zip
  • - Flash gapps in the same way
  • Reboot (first boot will take ~2 mins)
  • Once your device has booted, you can use the nAa notification to register for upcoming updates. This way you can get update notifications on new versions of MiniCM9 and the nAa-ics kernel!
Congratulation! Now you have Android 4.04 Ice Cream Sandwich on your phone. Feel free to leave a comment on the section below.

Droid Razr HD and Droid Razr Maxx HD: The Great Battrey Performance with The Lowest Price


Both devices have been announced by verizon to arrive soon on October 18. This news has been officially confirmed on the verizon's blog itself. The Motorola Droid Razr HD will run from $199.99 ,while the Motorola Droid Razr Maxx HD will cost a steeper $299.99. Both devices feature large 4.7-inch HD AMOLED screens and access to Verizon 4G LTE.

There is no difference between the specs of the two smartphones, save for the battery and internal memory size. Both handsets feature dual-core Qualcomm Snapdragon S4 silicon, 4.7" HD screen, 8MP, and Android 4.0 Ice Cream Sandwich. An update to Jelly Bean is in the pipeline for the duo before the year's end.

GENERAL
2G Network CDMA 800 / 1900
GSM 850 / 900 / 1800 / 1900
3G Network CDMA2000 1xEV-DO
HSDPA 850 / 900 / 1900 / 2100
4G Network LTE 700 MHz Class 13

BODY
Dimensions 131.9 x 67.9 x 8.4 mm
Weight 146 g
DISPLAY Type Super AMOLED capacitive touchscreen, 16M colors
Size 720 x 1280 pixels, 4.7 inches (~312 ppi pixel density)
Multitouch Yes
Protection Corning Gorilla Glass

SOUND
Alert types Vibration, MP3, WAV ringtones
Loudspeaker Yes
3.5mm jack Yes

MEMORY
Card slot microSD, up to 32GB
Internal 12 GB storage, 1GB RAM

DATA
GPRS Class 12 (4+1/3+2/2+3/1+4 slots), 32 - 48 kbps
EDGE Class 12
Speed Rev. A, up to 3.1 Mbps, LTE, HSPA+
WLAN Wi-Fi 802.11 a/b/g/n, Wi-Fi hotspot
Bluetooth Yes, v4.0 with LE+EDR
USB Yes, microUSB v2.0

CAMERA
Primary 8 MP, 3264x2448 pixels, autofocus, LED flash
Features Touch-focus, geo-tagging, face detection, image stabilization
Video Yes, 1080p@30fps
Secondary Yes, 1.3 MP

FEATURES
OS Android OS, v4.0.4 (Ice Cream Sandwich), upgradable to v4.1
CPU Dual-core 1.5 GHz
Sensors Accelerometer, proximity, compass

Messaging
SMS(threaded view), MMS, Email, Push Email, IM
Browser HTML, Adobe Flash
Radio No
GPS Yes, with A-GPS support and GLONASS
Java Yes, via Java MIDP emulator
Colors Black, White

- Active noise cancellation with dedicated mic
- Splash resistant
- microHDMI port
- SNS integration
- Google Search, Maps, Gmail
- YouTube, Google Talk, Picasa integration
- MP3/AAC+/WAV/WMA player
- MP4/H.263/H.264/WMV player
- Organizer
- Document viewer/editor
- Voice memo/dial/commands
- Predictive text input

BATTERY
Standard battery, Li-Ion 2530 mAh


LG Nexus Phone Shows Up for Sure, Many Photos are available


Another nexus phoes apparently will get to the reality. This time the phone which is called LG E960 or also called Mako is really amazing to compete with the other devices. This nexus device may become this year's nexus device or also named Google Optimus Nexus.

Beside the high-quality photos there is not much new information about the LG Nexus phone. The pre-production phone these guys have runs currently the latest Android Jelly Bean 4.1.2. On the front, there's a 4.7-inch screen with a resolution of 768x1280px. On the back, there's a 8 megapixel camera.

The real disappointment is on the inside. Despite the presence of the powerful quad-core Qualcomm chipset with 2GB of RAM, the built-in storage is only 8GB and there's no card slot for expansion. Judging on the limited storage, LG wouldn't like it for their Optimus Nexus phone to compete with their other flagships. It's much like how Samsung supplied a measly 5 megapixel camera on their Galaxy Nexus.

The leaked photos: